
Essential Equipment for Food Photography
Great food photography doesn't come from owning the most expensive gear. It comes from having the right tools: the ones that give you control over the final shot. When you get down to it, you really only need three things: a camera, a lens, and a light source. Let's break down what you actually need, without the confusing jargon.
Why Your Food Photography Gear Matters
As a restaurant owner, you pour your heart into every dish. Capturing that same passion and quality in a photograph is a huge challenge. You know great photos get customers to order, but the world of cameras and lighting can feel overly complicated and expensive.
The problem is clear. Hiring a professional for every new menu item adds up fast. Traditional photographers charge $75-150 per photo, and you often wait 2-7 days for the results. That’s a tough cost to justify, especially for seasonal specials.
The goal here isn't to turn you into a professional photographer overnight. It's to give you a practical understanding of the basic tools. When you know what a camera, lens, and light source really do, you can take menu photos that do your food justice. It’s all about gaining control over how the world sees your creations.
Whether you're starting with the phone in your pocket or thinking about a dedicated camera, the core ideas are the same. A better camera sensor can be a lifesaver in a dimly lit dining room. The right lens creates that beautiful, blurry background that makes a dish pop. And good lighting? That's the secret ingredient that makes food look fresh and appetizing.
Understanding Your Camera Options
Your camera is the heart of your setup, but don't overlook the powerful tool you might already own. Each type of camera simply offers a different trade-off between cost and creative control.
This chart breaks down the three main camera types based on how much they cost and how much manual control they give you.
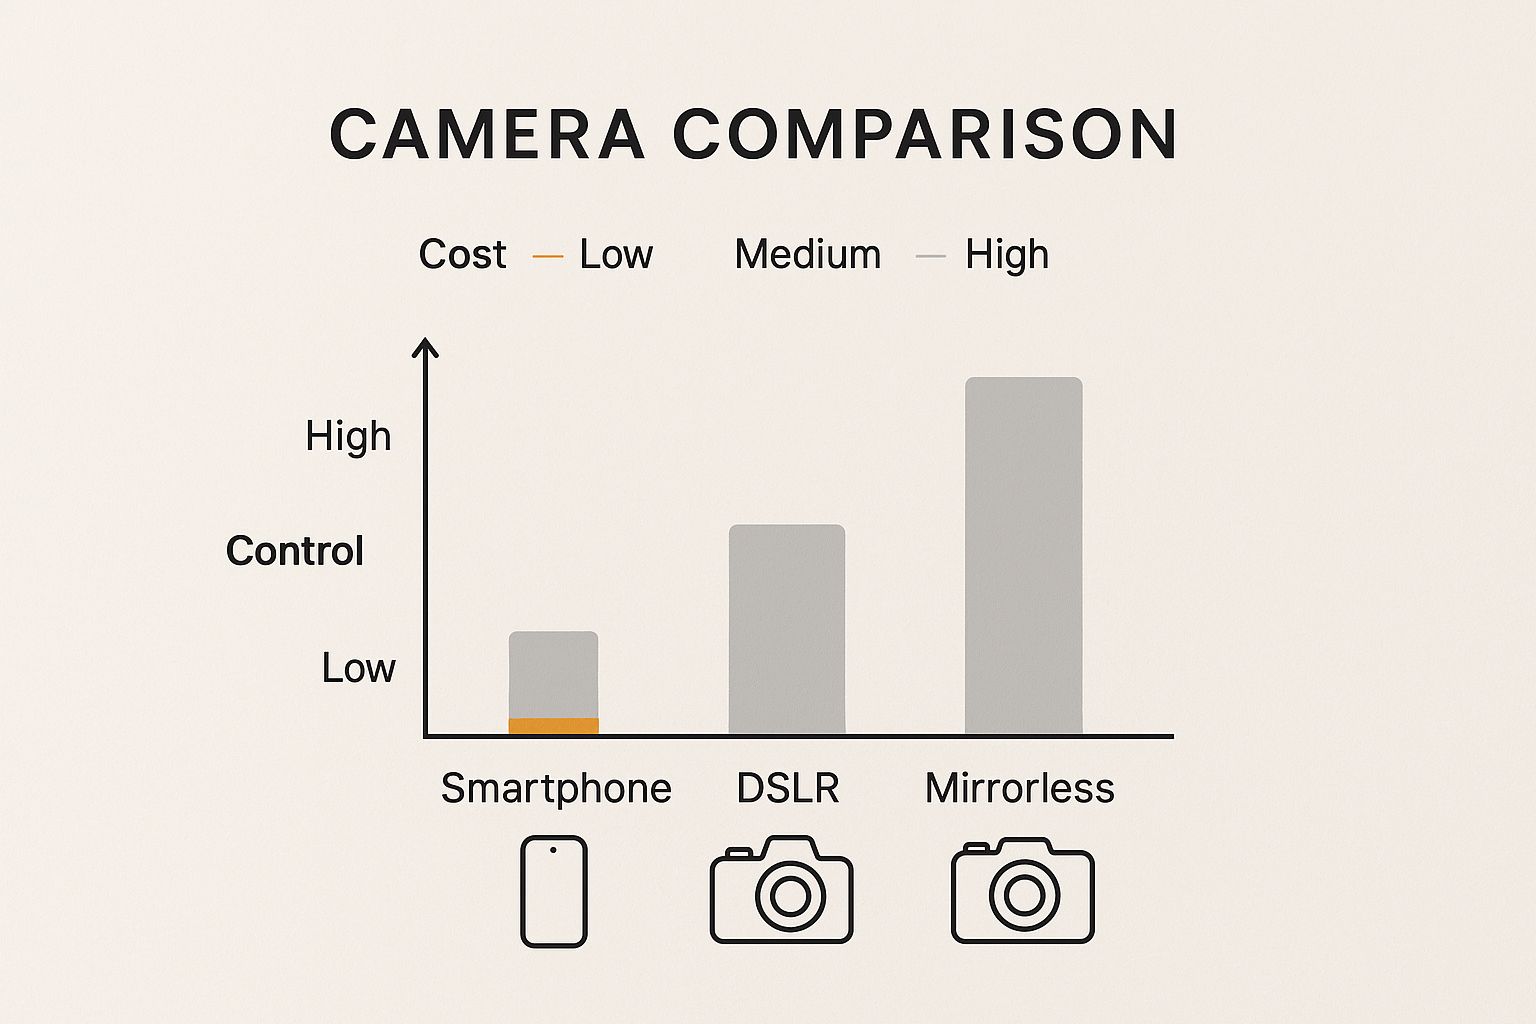
The takeaway is simple: advanced gear like a DSLR or mirrorless camera offers the highest degree of control, while your smartphone is a fantastic and affordable starting point. Your choice really depends on your budget and how deep you want to dive into the technical side of photography.
Remember, even if you stick with your phone, just understanding the basics of light and composition will make a world of difference in your photos.
Choosing the Right Camera for Your Restaurant
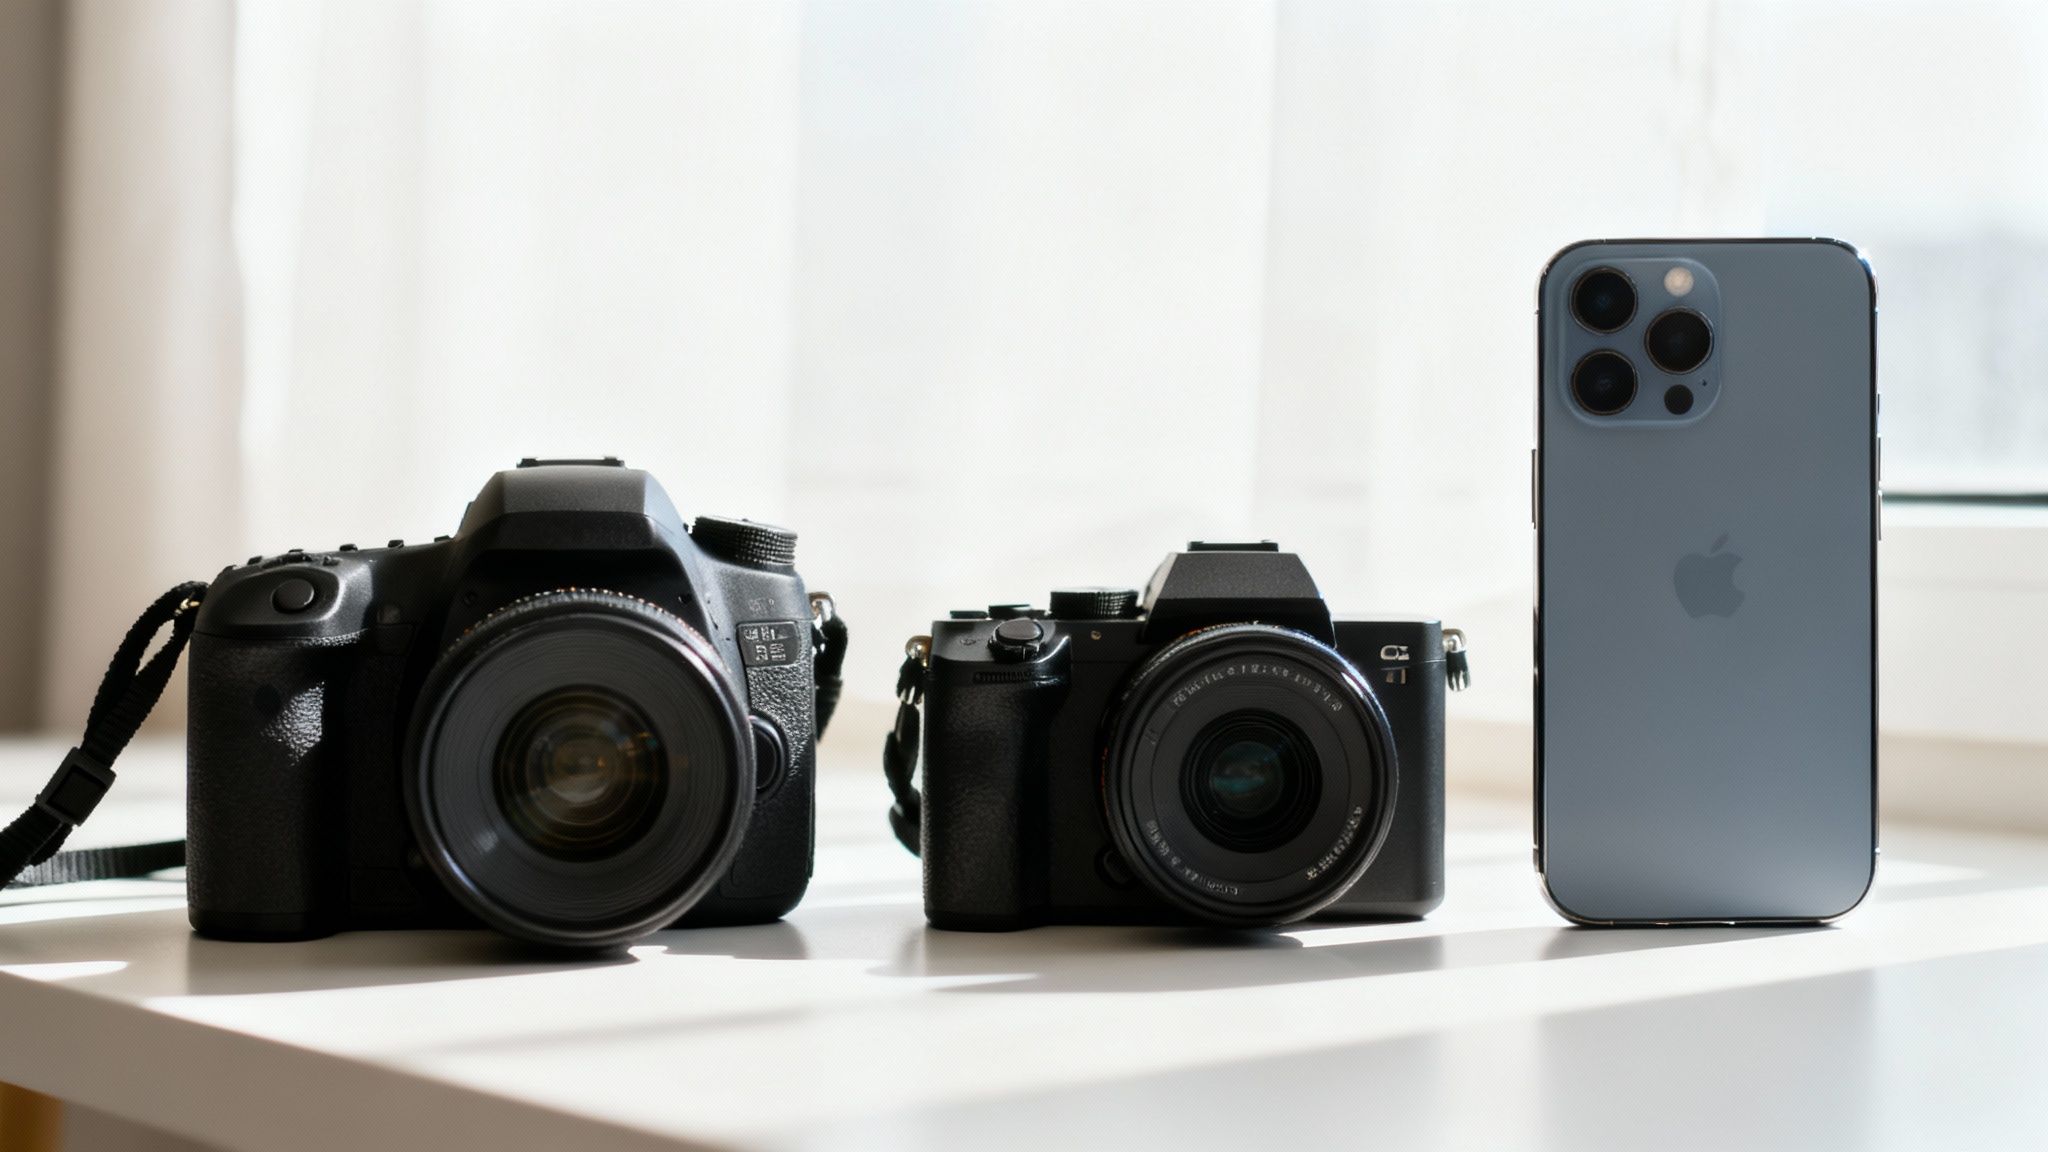
The camera is the heart of any photography setup, but here’s a secret: the best one for your restaurant might already be in your pocket. It’s easy to get lost in the technical weeds when talking about cameras, so let's cut through the noise. For a restaurant owner, it really just comes down to three practical choices: a modern smartphone, a DSLR, or a mirrorless camera.
The photography equipment market is huge and competitive. This is great news for you because it means there are more powerful and affordable camera options available than ever before. Let's figure out which one fits your needs.
Comparing Camera Options for Food Photography
Making the right choice depends on your budget, your goals, and how much control you want over the final image. Here’s a quick breakdown to help you compare the main contenders.
| Camera Type | Best For | Pros | Cons |
|---|---|---|---|
| Smartphone | Quick social media posts, menu updates, and getting started with a minimal budget. | Extremely convenient; no extra cost; great for well-lit situations; easy to share images instantly. | Struggles in low light; limited control over depth of field (blurry background); lower overall image quality. |
| DSLR | Achieving professional, high-quality images with full creative control. Great for print menus and large-format advertising. | Excellent image quality; huge selection of lenses; long battery life; full manual controls for any lighting situation. | Bulkier and heavier than other options; can have a steeper learning curve for beginners. |
| Mirrorless | A balance of professional quality and portability. Ideal for those who want DSLR-level results in a smaller package. | Top-tier image quality; compact and lightweight; electronic viewfinder shows a live preview of your final shot. | Can be more expensive than entry-level DSLRs; battery life is generally shorter than DSLRs. |
As you can see, each option has its place. A smartphone is a fantastic starting point, but a dedicated camera is what will truly elevate your food's visual appeal when you're ready.
Smartphones: The Smart Starting Point
Your smartphone is the most straightforward tool to get started with. The cameras on the latest models are powerful, especially if you have good light. They’re perfect for grabbing quick shots for Instagram or updating a dish on your online menu without a second thought.
So, what's the catch? The main limitation is their tiny sensor. A small sensor struggles to capture enough light, which is why photos taken in a dimly lit restaurant can look grainy or blurry. It also makes it much tougher to get that classic, professional-looking blurry background: what photographers call depth of field: that makes your dish pop right off the screen.
DSLR and Mirrorless Cameras: The Next Level of Control
When you’re ready for more creative control and consistently high-quality images, it’s time to look at a dedicated camera. Both DSLR and mirrorless cameras are a huge leap from a smartphone, mostly because of their larger sensors and the ability to swap out lenses.
- DSLR (Digital Single-Lens Reflex): These have been the workhorses of the photography world for years. They're built tough, have fantastic battery life, and offer a massive ecosystem of lenses. Most importantly, they give you full manual control over aperture, shutter speed, and ISO: the three pillars of photography that let you adapt to any lighting scenario.
- Mirrorless Cameras: These are newer, offering the same power as a DSLR but in a much lighter and more compact body. The key feature here is the electronic viewfinder, which shows you a real-time preview of your shot. This "what you see is what you get" feature can make mastering manual settings feel much more intuitive.
The real benefit of a dedicated camera lies in its larger sensor. A bigger sensor takes in more light, which translates to cleaner, sharper photos, even in your dining room's ambient light. It also makes it a breeze to create that beautiful, soft-focus background that separates the hero dish from its surroundings. If you're eager to learn more, our complete restaurant food photography guide dives deep into these techniques.
The decision to upgrade from a smartphone comes down to one thing: control. A dedicated camera gives you the power to tell the light what to do, to decide exactly what is in focus, and to produce consistently professional results every single time you shoot.
Ultimately, the best camera is the one that fits your ambition and your budget. Getting great shots with your phone is an excellent first step. But when you want to give your menu the visual identity it deserves, investing in a good DSLR or mirrorless camera will pay for itself with every photo you take.
Selecting Lenses That Make Food Look Irresistible
If the camera is the body, the lens is its eye. And it might be the most important piece of gear you own. The lens you choose dictates how your customer sees the food: its size, its shape, its texture. Getting this right is the secret to taking photos that make people hungry.
The world of camera lenses can feel a bit overwhelming, with all the talk about "focal length" and "aperture." Don't worry about that. We're going to cut through the noise and focus on the only two lenses you really need to get started.
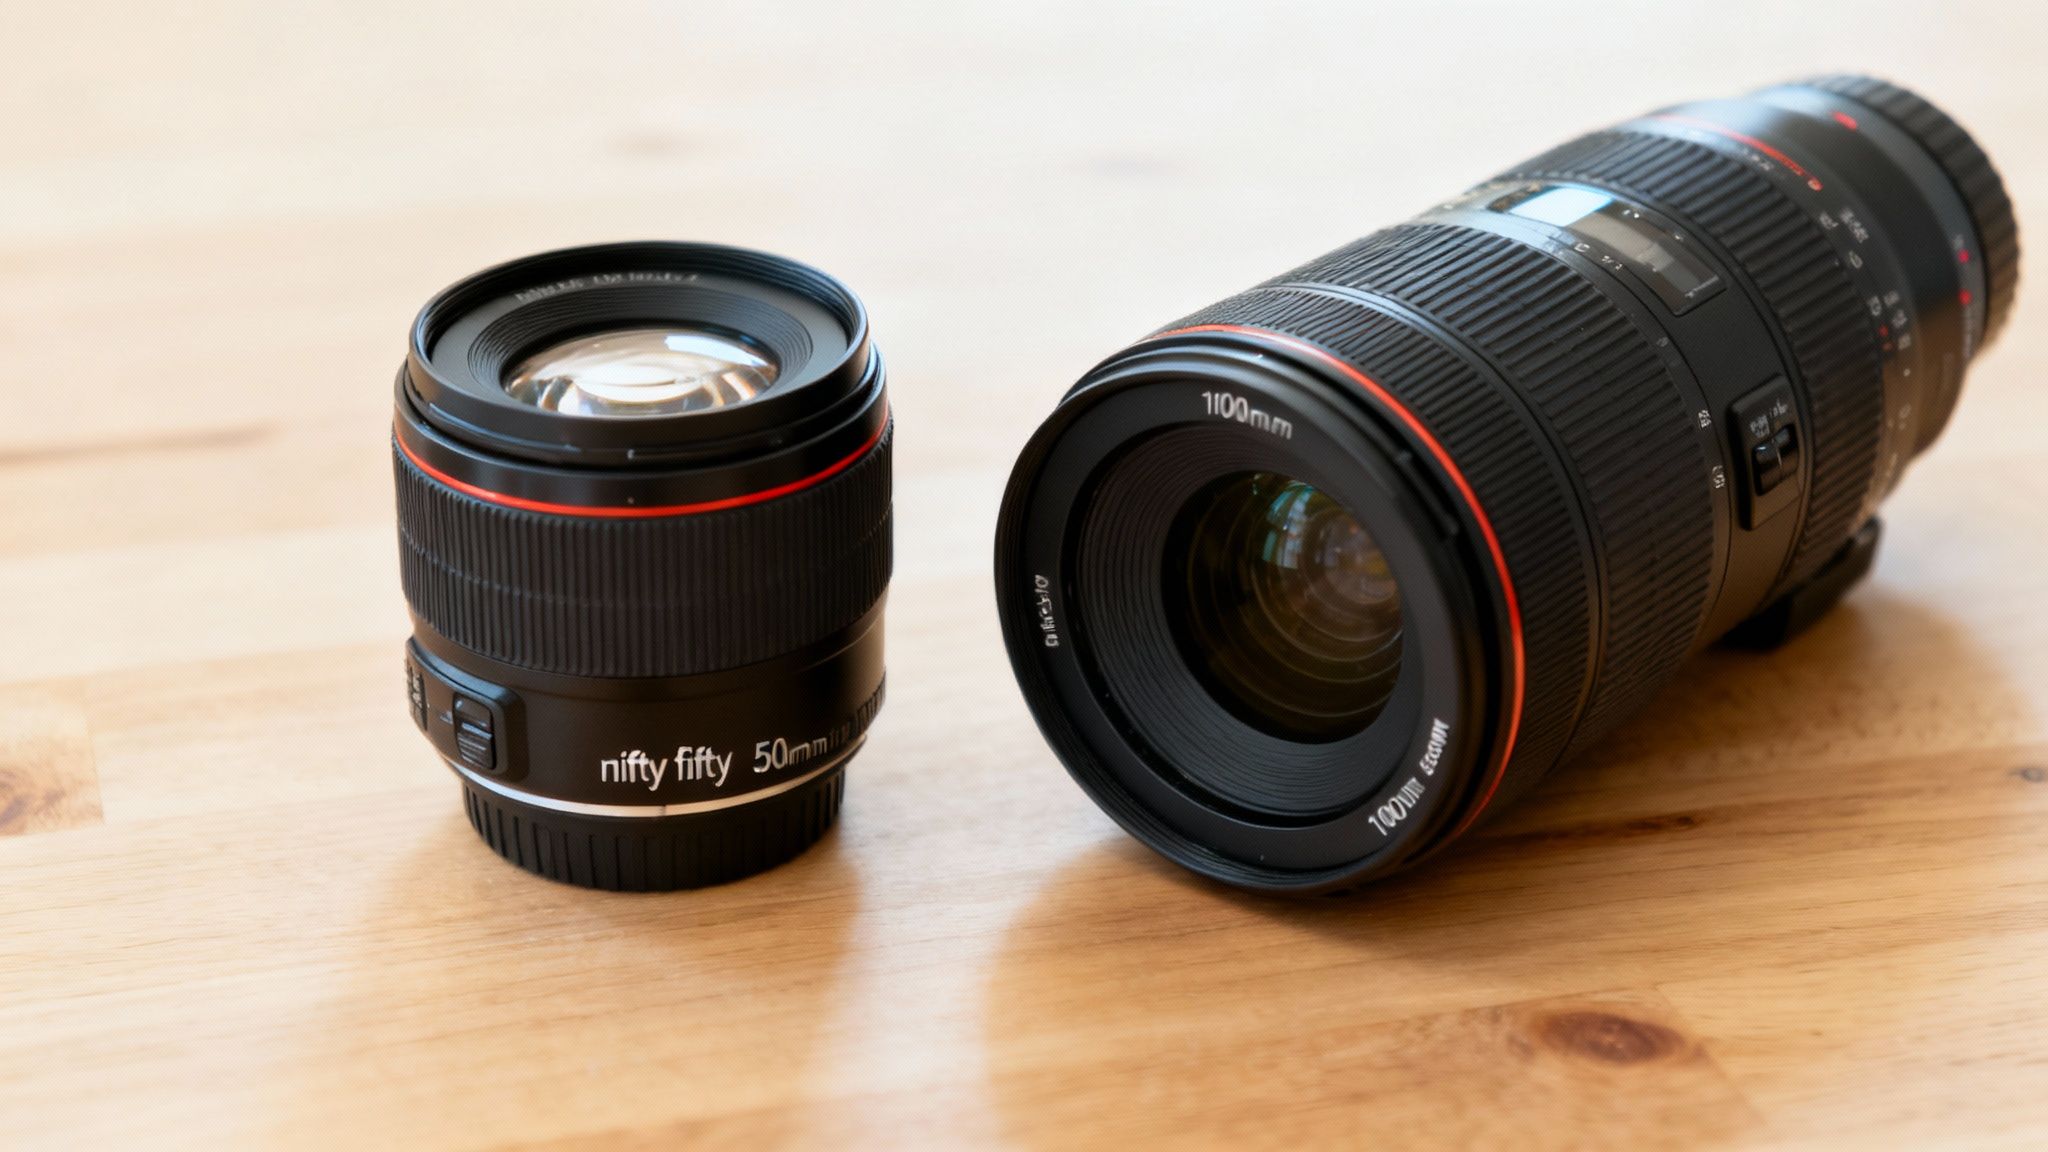
The Workhorse: 50mm Lens
There's a reason photographers call this lens the "nifty fifty." A 50mm lens is incredibly versatile, and its biggest strength is that it sees the world almost exactly like the human eye does. That means no weird distortion: your food looks natural, authentic, and relatable.
This is your go-to lens for capturing a plate in its environment. Picture a brunch spread on a table or a burger and fries set on a rustic board. The 50mm focal length lets you step back a bit to include some context, like a glass of wine or scattered ingredients, without ever losing focus on the star of the show.
- Best for: Tabletop scenes, overhead flat lays, and showing a dish in its setting.
- Why it works: It offers a natural field of view that feels honest and inviting, as if the viewer is sitting right at the table.
- Practical Use: You'll probably reach for this lens for 80% of your shots, from website banners showing a full table to social media posts of your daily special.
Because the 50mm is so common, you can find fantastic, high-quality options that are surprisingly affordable. It's a small investment that delivers a massive jump in quality over the standard lens that came with your camera.
The Detail-Oriented: 100mm Macro Lens
While the 50mm tells the story of the whole scene, the 100mm macro lens gets right up close with the food. A "macro" lens is built for extreme close-ups, letting you capture the tiniest details with razor-sharp clarity. This is the lens that takes a photo from good to mouth-watering.
Think about the crust on a seared steak, the delicate crumb of a fresh pastry, or the glossy sheen on a chocolate dessert. A 100mm macro makes those details pop. It also creates a very shallow depth of field, which blurs the background into a soft, creamy wash of color. This forces the viewer's eye exactly where you want it: on the most delicious part of the dish.
- Best for: Highlighting textures, showcasing ingredient quality, and creating dramatic, crave-worthy close-ups.
- Why it works: It isolates the food from its surroundings, making every crystal of salt or drop of sauce look heroic.
- Practical Use: Pull this lens out when you want to capture the juicy interior of a sliced sandwich, the intricate layers of a lasagna, or the fine herbs sprinkled over pasta.
The difference between these two lenses is all about perspective. The 50mm says, "Come sit down and enjoy this meal." The 100mm macro leans in and says, "Just look at how perfectly cooked this is."
For any restaurant owner, having both gives you a complete storytelling toolkit. Use the 50mm to set the scene and establish a vibe, then switch to the 100mm macro to capture the details that prove your quality. Together, they're a powerful combination.
You Don't Need a Studio to Master Light
Great lighting is the single most important ingredient in a food photo. It’s the difference between a dish that looks vibrant and delicious, and one that looks flat, dull, and unappetizing. The good news? You don't need a professional studio or a truckload of expensive gear. You just need to understand how to find or create beautiful light.
Let's look at two ways to do this: working with the light you already have (natural light) and creating your own with some simple tools (artificial light).
This section will show you how to use the best free light source available: a window: and then how a few affordable pieces of gear can give you total control, no matter the time of day.
Working with Natural Window Light
Your best friend in food photography is often a large window. The soft, gentle light that streams in, especially on a slightly overcast day, is perfect. It wraps around the food, creating soft shadows and beautiful highlights that bring out all the delicious textures.
The trick is to avoid direct, harsh sunbeams. If the sun is blasting straight through your window, it creates stark, dark shadows that will kill the appeal of your dish. An easy fix? Tape a thin white bedsheet or even some parchment paper over the glass. This acts as a giant diffuser, instantly softening that light into something more flattering.
Where you place your setup is everything. Always set up next to the window, so the light is coming from the side. This is called side lighting, and it's the secret to carving out details and giving the food a sense of depth and dimension. The one thing you never want to do is shoot with the window behind you; this creates flat, boring front lighting that washes everything out.
Taking Control with Simple Artificial Light
As beautiful as window light is, it's not exactly reliable. It changes by the hour and vanishes at night. If you need to shoot a new menu item during dinner service, you need a lighting source you can count on. This doesn’t mean you need a complicated studio setup.
You can get great results with just a single artificial light. Here are two fantastic, budget-friendly options to get you started:
- LED Panels: These are "continuous" lights, which means they stay on. This is a huge help for beginners because you can see exactly how the light is hitting your food in real-time. What you see is what you get.
- External Flash (Speedlite): A flash, or speedlite, gives you a powerful pop of light that can easily overpower any weird ambient lighting in your restaurant, resulting in clean, crisp shots. You'll just need a wireless trigger to use it off-camera.
Whichever you choose, never point the bare light directly at your food. Just like direct sun, a bare bulb is harsh and creates ugly highlights and shadows. That's where light modifiers come in. To see how different lighting tools come together, you can find more detail in our comprehensive guide to food photography lighting techniques.
Shaping Your Light with Modifiers
A light modifier is just a term for anything you put between your light and your subject to change the light's quality. For food, the goal is almost always to make the light source bigger and softer. A larger, softer light source wraps around the subject more gently, creating those soft, appealing shadows.
A simple piece of white foam board is one of the most powerful and affordable lighting tools you can own. Place it opposite your light source to bounce light back into the shadows, brightening them up and revealing more detail.
Here are the only modifiers you really need to start:
- Softbox: This is a fabric box that fits over your light. The white panel on the front diffuses the light, turning a small, harsh bulb into a big, soft source: like creating your own portable window. A 2x3 foot softbox is a great, versatile size to start with.
- Reflector: A simple piece of white foam board from an art store is non-negotiable. Place it opposite your light to bounce some of that light back onto the dark side of your dish, filling in the shadows just enough. You can also use a black piece of foam board to do the opposite and make the shadows deeper for a more dramatic, moody look.
By combining one light, a softbox, and a reflector, you have a complete, controllable lighting kit. You can perfectly replicate that beautiful window light anytime, day or night. This simple setup is all it takes to master light and make your food look as incredible as it tastes.
The Supporting Cast: Essential Accessories That Make Your Photos Pop
Your camera, lens, and lights are the stars of the show, but it's the small, supporting accessories that really make a photo professional. They provide the stability, control, and context that turn a simple picture into a quality image. These are the workhorse tools that make your life easier and your food look better.
Don't underestimate the power of these smaller pieces. You only need a handful of these tools to see a dramatic improvement in your work.
Your Foundation for Sharpness and Stability
Let's start with the absolute must-haves. These two items aren't glamorous, but they are the foundation of consistently sharp, professional photos.
-
A Sturdy Tripod: If you buy only one accessory, make it this one. A good tripod eliminates the natural handshake that causes blur, guaranteeing your images are sharp. It also locks your camera angle in place, which is a huge help. It frees up your hands to arrange the food, adjust a prop, or hold a reflector without messing up your composition.
-
Remote Shutter or Timer: Just pressing the shutter button can introduce a tiny, image-ruining shake. A remote shutter lets you fire the camera without touching it. No remote? No problem. The 2-second timer built into your camera accomplishes the exact same thing, and it's completely free.
Using a tripod does more than just stop camera shake. It forces you to slow down and be more intentional with your composition. It's one of the fastest ways to improve your photography.
Tools for Painting with Light and Shadow
With your camera locked down and stable, it's time to start shaping the light and crafting the mood. The best tools for this are surprisingly simple and cheap.
Grab a piece of white foam board from any craft store: it's a game-changer. When you place it opposite your main light source, it acts as a giant reflector, gently bouncing soft, beautiful light back into the shadows. This simple move instantly brightens the dark side of your dish, bringing out all the details.
Want to create a more dramatic, moody shot? Swap the white board for a piece of black foam board. Instead of reflecting light, it absorbs it. This deepens the shadows, punches up the contrast, and creates a more atmospheric vibe.
Backdrops and Props That Set the Scene
The surface under your plate is just as important as the food on it. It establishes the entire mood of the photograph. You don't need a huge collection to get started: just a few versatile pieces will do.
- Vinyl Backdrops: These are fantastic. They're basically rolls of vinyl printed to look like convincing textures: think rustic wood, sleek marble, or moody slate. They're a breeze to clean, easy to roll up and store, and relatively inexpensive.
- Tiles and Planks: For truly authentic surfaces, head to the hardware store. A single large slate tile or a couple of weathered wood planks can become beautiful, go-to backgrounds for your shots.
When it comes to props, remember the golden rule: less is more. Your goal is to add a touch of context, not to create clutter that distracts from the food. A simple linen napkin, a vintage fork, or a small ramekin with a key ingredient is often all you need to help tell the dish's story. Always choose items that align with your restaurant's brand and the overall style of the food.
If you ever feel stuck with your physical options, you can use a food background generator to digitally add or swap backgrounds after the shoot. It opens up a world of creative possibilities. By building out this small kit of essential accessories, you'll gain the control you need to add that final layer of professional polish to every photo you take.
A More Practical Approach to Professional Photos
When you lay out all the cameras, lenses, lights, and accessories, you start to see why traditional food photography doesn't come cheap. There's a reason a professional photographer charges anywhere from $75 to $150 per photo and why it can take anywhere from 2 to 7 days to get your final images back. It’s a craft that demands technical skill, expensive gear, and a significant time investment.
We built MenuCapture because we felt restaurant owners deserved a more practical way forward. You’ve already poured your heart into creating the food; you shouldn't have to become a photography expert just to show it off. Most AI photo tools generate random food images. MenuCapture edits YOUR actual photos.
Skip the Gear and Take Control
What if you could skip the thousands of dollars in equipment and just use the powerful camera you already carry in your pocket? The concept is straightforward: you snap a picture of your dish with your smartphone, and our AI steps in to handle the professional-level editing in 10-30 seconds.
This isn't about generating fake food. MenuCapture edits your actual photos, so the unique look of your dishes is always preserved. You get the creative direction of a full photoshoot without the complexity and cost.
The primary feature is that you can direct the AI with simple, typed instructions to make specific changes. Type instructions like:
- "Add melted cheese on top."
- "Make the sauce glossier."
- "Change the lighting to warmer."
- "Swap the chicken for tofu."
This process puts you in the director's chair. You can edit the same image multiple times, and MenuCapture keeps a full version history with thumbnails so you can always go back. All your images are automatically organized in a searchable gallery.
The Real Cost and Time Savings
The market for photography equipment is growing. As one study notes, people are serious about high-quality images. But for a busy restaurant owner, owning and mastering all that gear is a huge undertaking. You can learn more about the market's growth and the technologies driving it, but the bottom line is that the traditional route is a major commitment.
Let’s look at a side-by-side comparison.
Traditional Photography:
- Cost: $75-150 per photo.
- Time: 2-7 day turnaround.
- Effort: Requires photographer scheduling, studio setups, and re-shoots cost extra.
- Result: Quality can vary depending on the photographer.
MenuCapture AI Processing:
- Cost: $0.24 per photo (weekly plan) or $0.09 (annual plan).
- Time: 10-30 second processing.
- Effort: Works with smartphone photos, no scheduling needed.
- Result: Consistent AI results, and you can edit multiple times.
When you run the numbers, you can save 99.9% on menu photo costs while getting results in seconds instead of days. This means you can create a new special, photograph it, and have it posted on your menu all in the same afternoon.
The point isn't to replace the artistry of a great photographer. It's about giving you a practical tool that works at the speed—and budget—of a real restaurant.
Got Questions About Food Photography Gear? We’ve Got Answers.
We hear these questions all the time from restaurant owners just starting out. Here’s a straightforward breakdown of what you really need to know.
Can I Get Away With Just Using My Smartphone?
You absolutely can. Don't let anyone tell you otherwise. The cameras in today's smartphones are shockingly good, and they're more than enough to capture beautiful food photos, especially when you have great natural light to work with.
Ultimately, food photography is less about the camera and more about your control over light and composition. A dedicated camera gives you more flexibility in tricky, low-light situations or for achieving that classic blurry background (bokeh), but your phone is the perfect tool to start learning the ropes without spending a dime.
If I Can Only Afford One Thing, What Should It Be?
Hands down, lighting. Assuming you already have a decent phone or camera, your first investment should be a solid artificial light source and a softbox.
This one purchase will improve your photos more dramatically than a new camera or lens ever could. Great light is what makes food look delicious and three-dimensional; it’s the single most important ingredient in a great food photo.
What’s the Easiest Way to Get Pro-Looking Backgrounds on a Budget?
Vinyl backdrops are a food photographer's best friend. They're inexpensive, they come in every imaginable texture: from rustic wood to sleek marble: and they’re a breeze to clean and store. You can also get creative and head to a local hardware store for single slate tiles or unique wood planks for a truly authentic feel.
Pro Tip: Never underestimate the power of a simple piece of foam board. A large white or black foam board from any craft store makes for a clean, elegant, and distraction-free background that lets your dish be the star.
Is a Tripod Really Necessary?
Yes, it truly is. A tripod does one job, and it does it perfectly: it holds your camera completely still. This guarantees your images are sharp, eliminating any chance of blur from camera shake.
But it does more than that. By locking your camera in a fixed position, it frees up your hands to meticulously arrange the food, style the props, and adjust your lighting. Even a basic, affordable tripod is a game-changer for getting that crisp, professional look.
Instead of sinking money and time into all this gear, MenuCapture can turn your simple smartphone snaps into mouthwatering photos in about 30 seconds. Just type what you want: like "make the sauce look glossier" or "add a wisp of steam": and get total creative control without the expensive and complicated setup.
Ready to transform your menu photos?
Type what you want changed and AI processes your restaurant photos in seconds.
Start Processing Photos