
How to Take Food Photos That Drive Restaurant Sales
You want to take great food photos, right? It really comes down to three things: find soft, natural light (a window is your best friend), style the dish to look its best, and choose an angle that shows off its key features. Get those right and you can make people hungry with just your phone. No expensive camera needed.
Why Great Food Photos Matter More Than Ever
You pour your heart and soul into every plate that leaves your kitchen. The quality is there, the flavors are perfect, and the presentation is thoughtful. But when someone is scrolling through their phone trying to decide where to eat, they can't taste any of that.
All they have to go on is a picture. In that split second, your food photos become your menu, your brand, and your first impression. Research shows that photos influence the dining decisions of nearly two out of three people. That's a huge number of potential customers won or lost on a single image. A blurry, poorly lit shot of your signature burger quietly suggests a lack of attention to detail. A vibrant, well-shot photo communicates quality and care before anyone reads a single review.
So why doesn't every restaurant have a gallery of perfect shots? The answer we hear from owners almost always comes down to the same three roadblocks:
- Cost: Hiring a traditional food photographer runs $75-150 per photo. For a full menu, that can easily hit thousands of dollars, and it becomes a recurring bill every time you add a seasonal special.
- Time: Finding a photographer, booking a shoot, and coordinating everything can take weeks. Then you wait another 2-7 days for final images. That timeline doesn't work when you need to promote a new lunch special tomorrow.
- Skills: You're a chef, a manager, an entrepreneur. You don't have time for a crash course on camera settings, lighting rigs, and editing software.
There's a fourth problem people mention less often: consistency. Hire different photographers over the years and you end up with photos that don't match, which makes your menu and marketing look disjointed.
These are real challenges, and they're frustrating. It's tough when you know your food is great but the photos representing it online don't do it justice. Your images are also a core piece of your wider online presence, which is worth understanding as part of your overall digital marketing strategy for restaurants.
We built MenuCapture because restaurant owners deserve a tool that works with their actual food photos. Most AI tools generate random fake food from text. That's not what you need. MenuCapture edits your real photos, so customers see your burger, just in its most flattering light.
This guide walks you through taking those base photos yourself, then using simple tools to get a professional finish, all on your own schedule and budget.
Set Up Your Shot Without a Studio
Forget the idea that you need a professional studio. The most powerful tool for the job is probably in your pocket right now: your smartphone. The real secret isn't the gear; it's controlling the environment, especially the light.
Find Your Best Light
The best light for food photography is almost always soft, natural, indirect sunlight. Picture the diffused light coming through a window on a slightly overcast day. It wraps around your food, minimizes harsh shadows, and brings out rich, accurate colors.
Natural light is the standard for a reason: it's honest. It shows food in its true colors, which kitchen lights and camera flashes never do. What you want to avoid is direct, intense sun beaming through the glass. It creates deep, distracting shadows and can blow out colors until the food looks washed out.
Walk through your dining room during the day and find a table near a window that gets bright, indirect light. That spot is your new photo studio. Then turn off the artificial lights. Overhead kitchen fixtures cast a yellow hue and ugly shadows, and your phone's built-in flash is even worse: it flattens the shot, creates glare on sauces, and can make a dish look greasy. Just don't use it.
A common mistake is thinking you need more light, so you turn on every light in the room. In reality, you need better light. One good window is worth more than a dozen overhead fixtures.
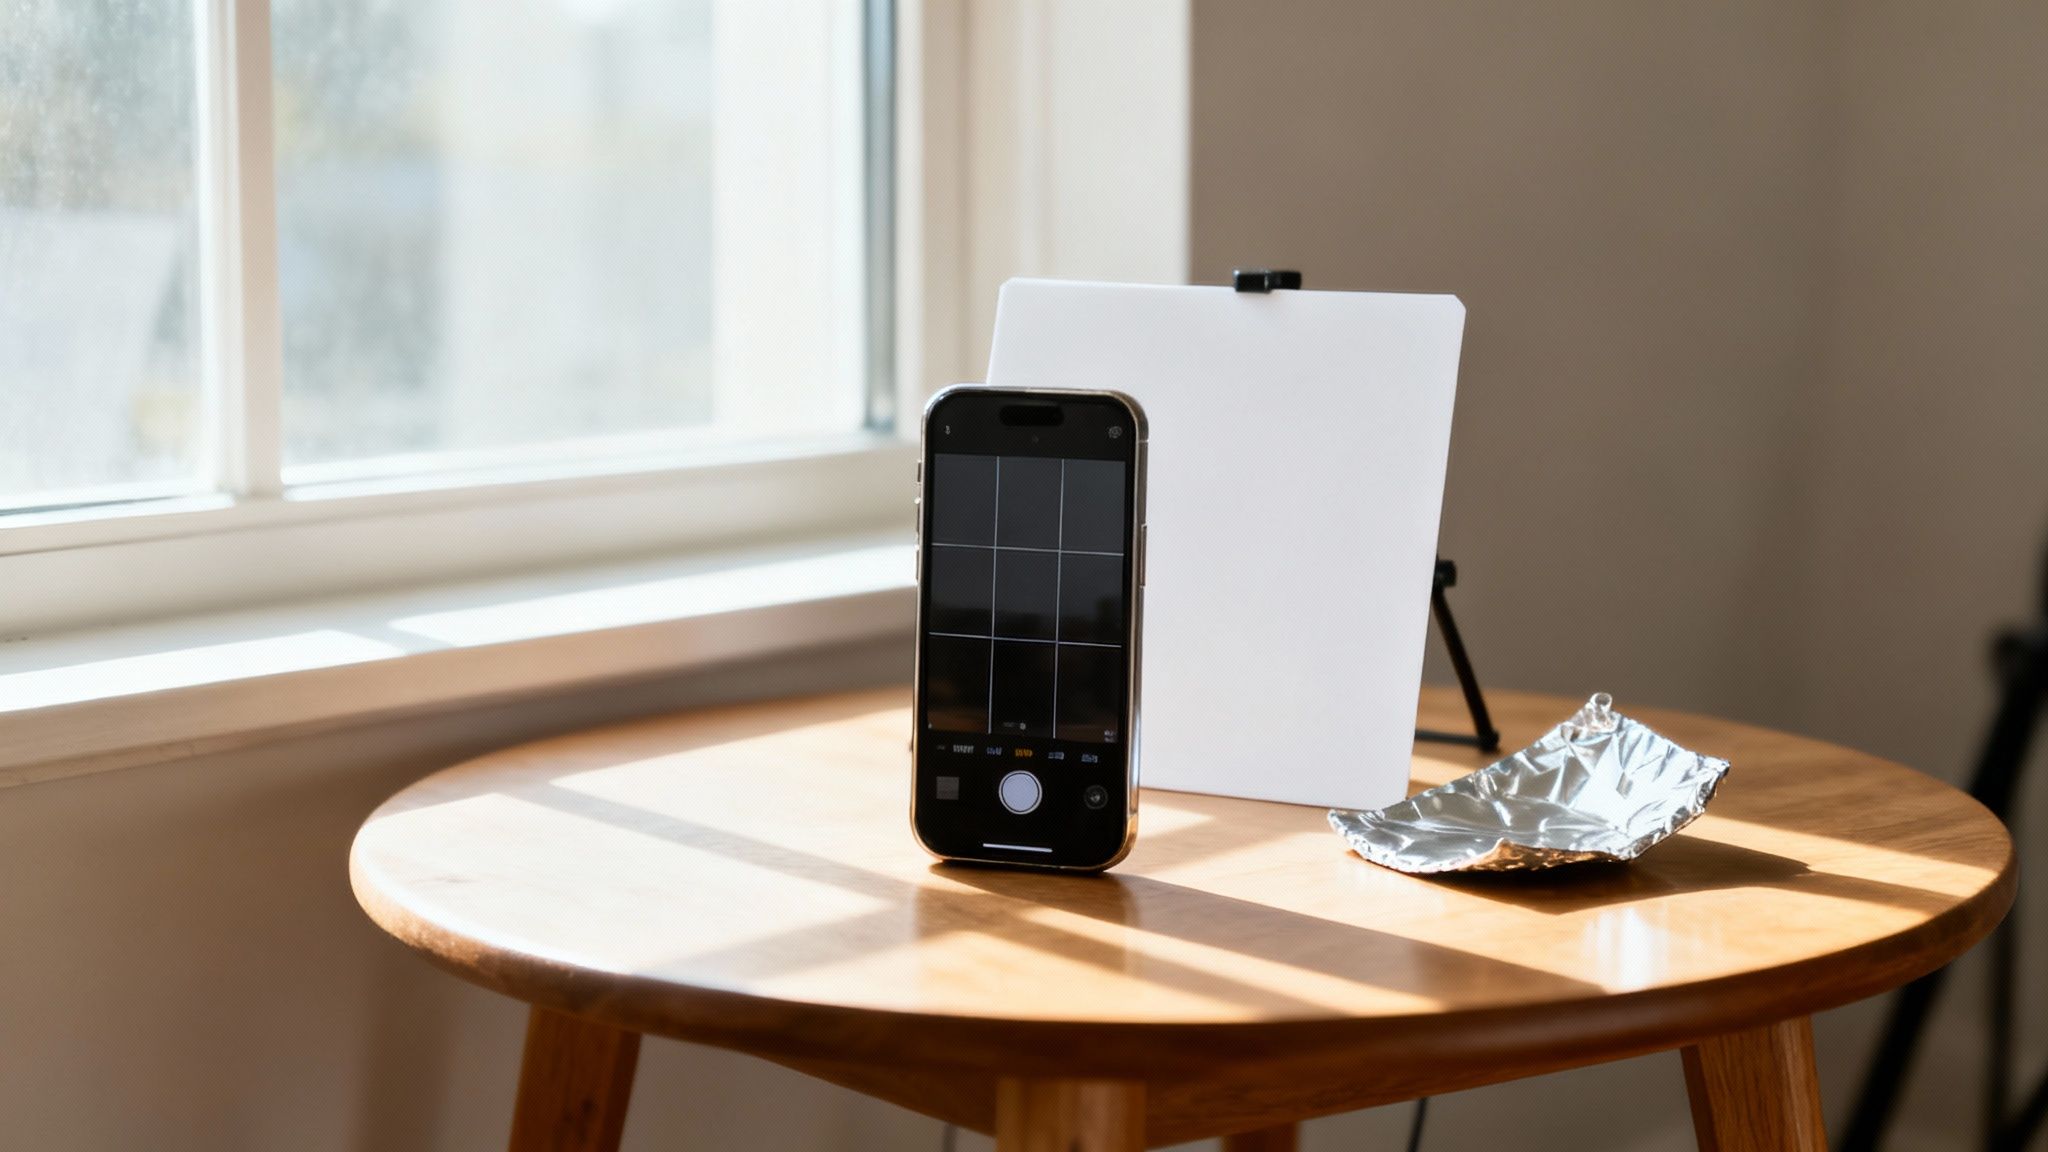
You can shape that window light with everyday items:
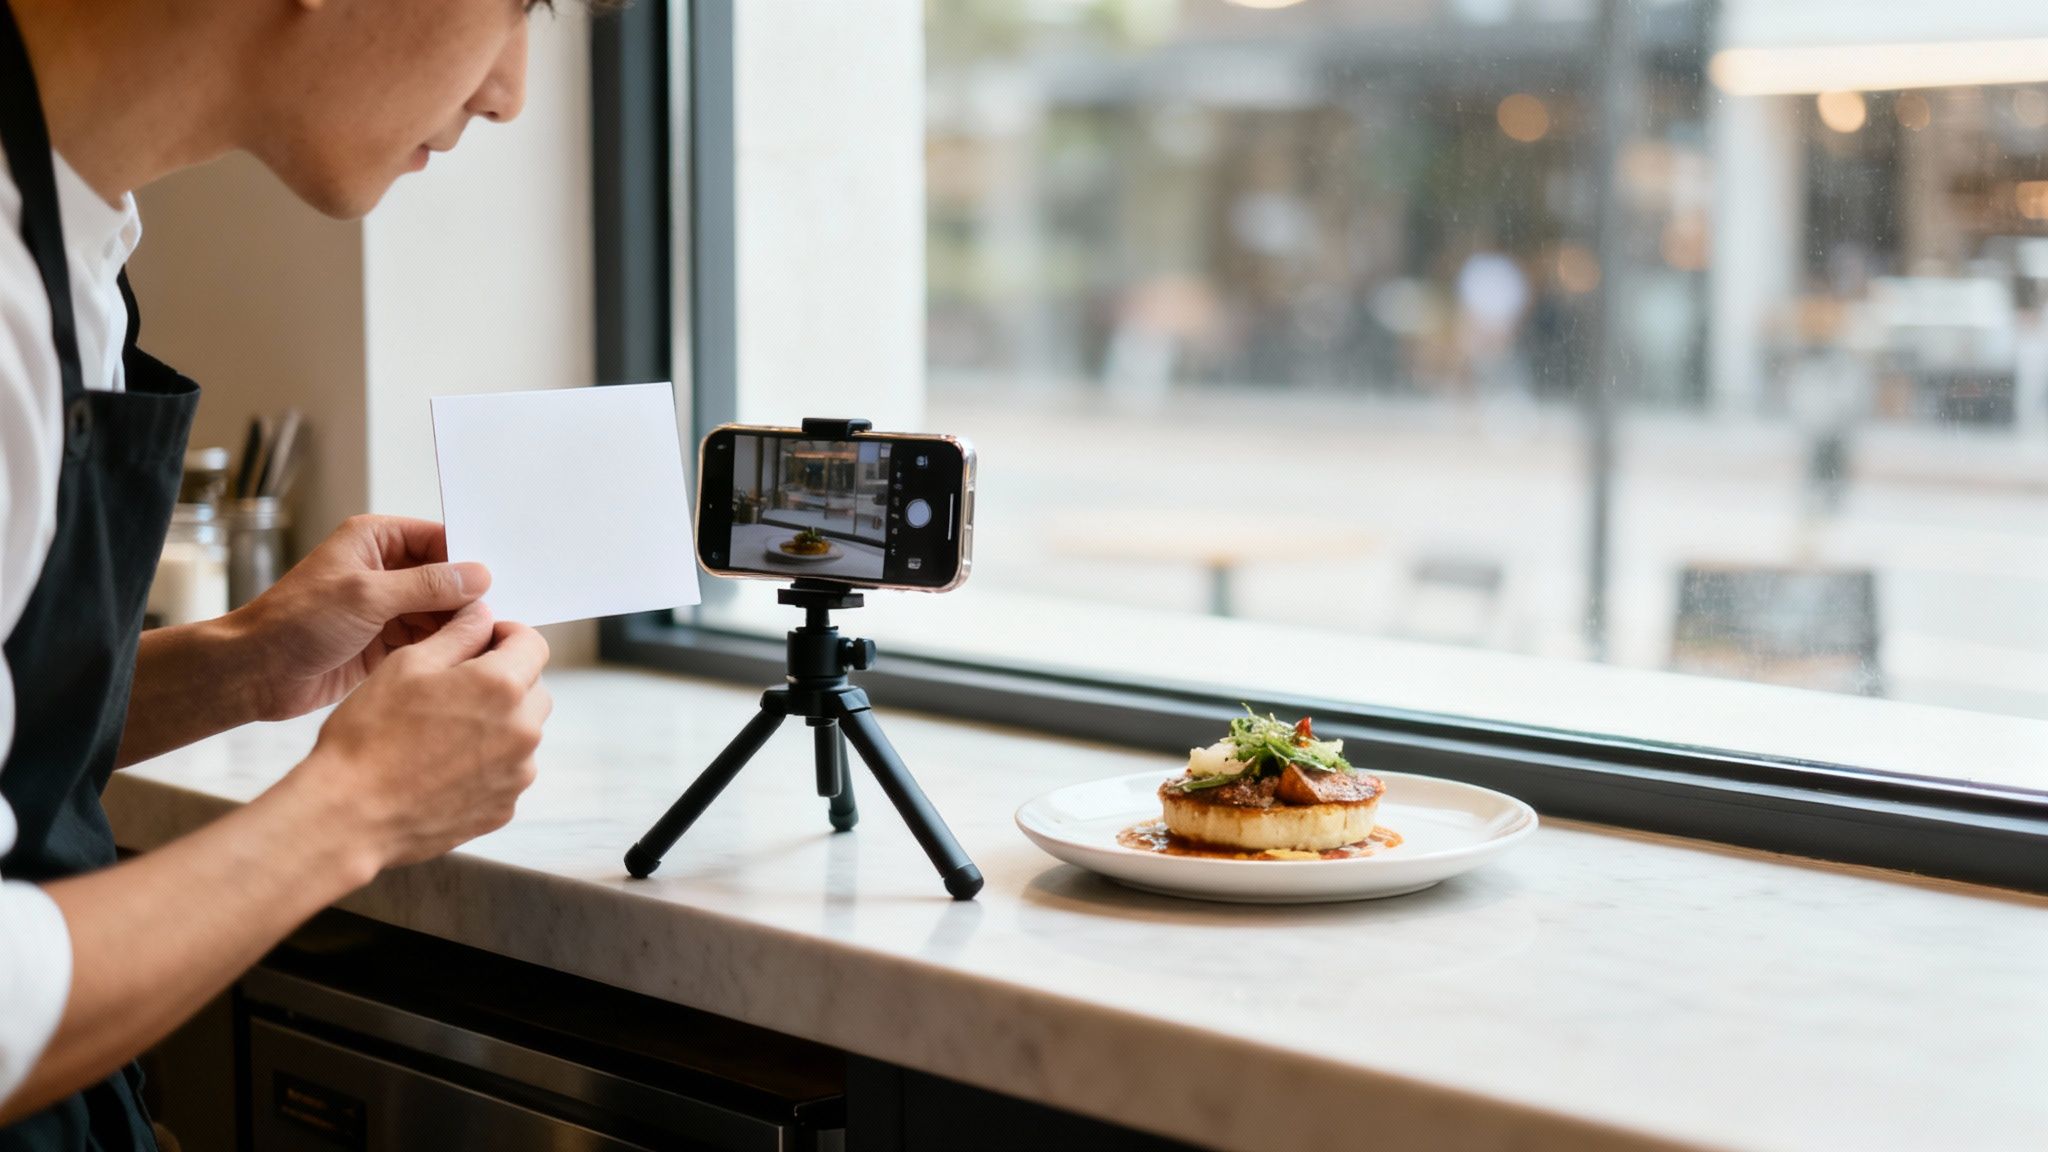
- Create a bounce card: Position a piece of white foam board (or even a clean white menu) opposite the window to bounce soft light back into the shadow side of the dish. This one trick instantly makes the plate look more evenly lit.
- Improvise a reflector: Need more pop? Crumple a piece of aluminum foil, flatten it back out, and use it the same way. The texture spreads the reflected light evenly.
- Soften harsh sun: If direct sunlight is blasting through the window, tape white parchment paper or hang a thin white curtain over the pane. It works like a professional diffuser.
Prep Your Phone in 30 Seconds
Before you snap a single photo, do three quick things:
- Wipe your lens. Your phone lives in a kitchen, so the lens collects fingerprints and grease. A quick pass with a soft cloth is the difference between hazy and crystal clear.
- Turn on the gridlines. In your camera settings, switch on the 3x3 grid. You'll use it for composition in a minute.
- Tap to focus, then adjust exposure. Tap the screen on the most important part of the dish (the melted cheese, the glossy sauce, the crispy edge) so it's tack sharp. A small sun icon or slider appears; nudge it up slightly, since most food photos look best a touch bright.
For more low-cost gear ideas, see our guide to equipment for food photography.
Style the Plate for the Camera
Styling isn't about making food look fake. It's about small, intentional choices that show off what's already there. Ask yourself: what's the star of this dish? The fresh basil on the pizza? The glossy sheen on the ribs? That's what the camera should celebrate.
Choose Backgrounds and Props
The surface under the plate matters as much as the food. A cluttered background steals attention. Look around your restaurant for simple, textured surfaces:
- A wooden table with visible grain for warmth and a rustic feel
- Slate, granite, or a concrete-style placemat for contrast that makes colorful food pop
- A single-color linen napkin for a subtle layer of texture
- A large sheet of brown, black, or gray craft paper as a cheap, consistent backdrop
For props, think about what a customer would actually see: a fork beside the plate, a glass of water blurred in the background, a few scattered fresh ingredients. Less is almost always more.
Key takeaway: Build a believable scene. Props should support the main dish, never compete with it. A few carefully chosen items look far better than a cluttered setup.
Smart restaurant teams often set up a dedicated styling station near their best window, keeping two or three go-to backgrounds and props within reach. That small habit creates a consistent, recognizable look for your brand.
Quick Styling Wins
Plating for a photo is slightly different from plating for a guest. A few practical tricks:
- Use slightly smaller plates. Portions look more generous and the food fills the frame. It's a classic stylist's illusion, and it works.
- Create height. Don't lay everything flat. Stacked ingredients add dimension.
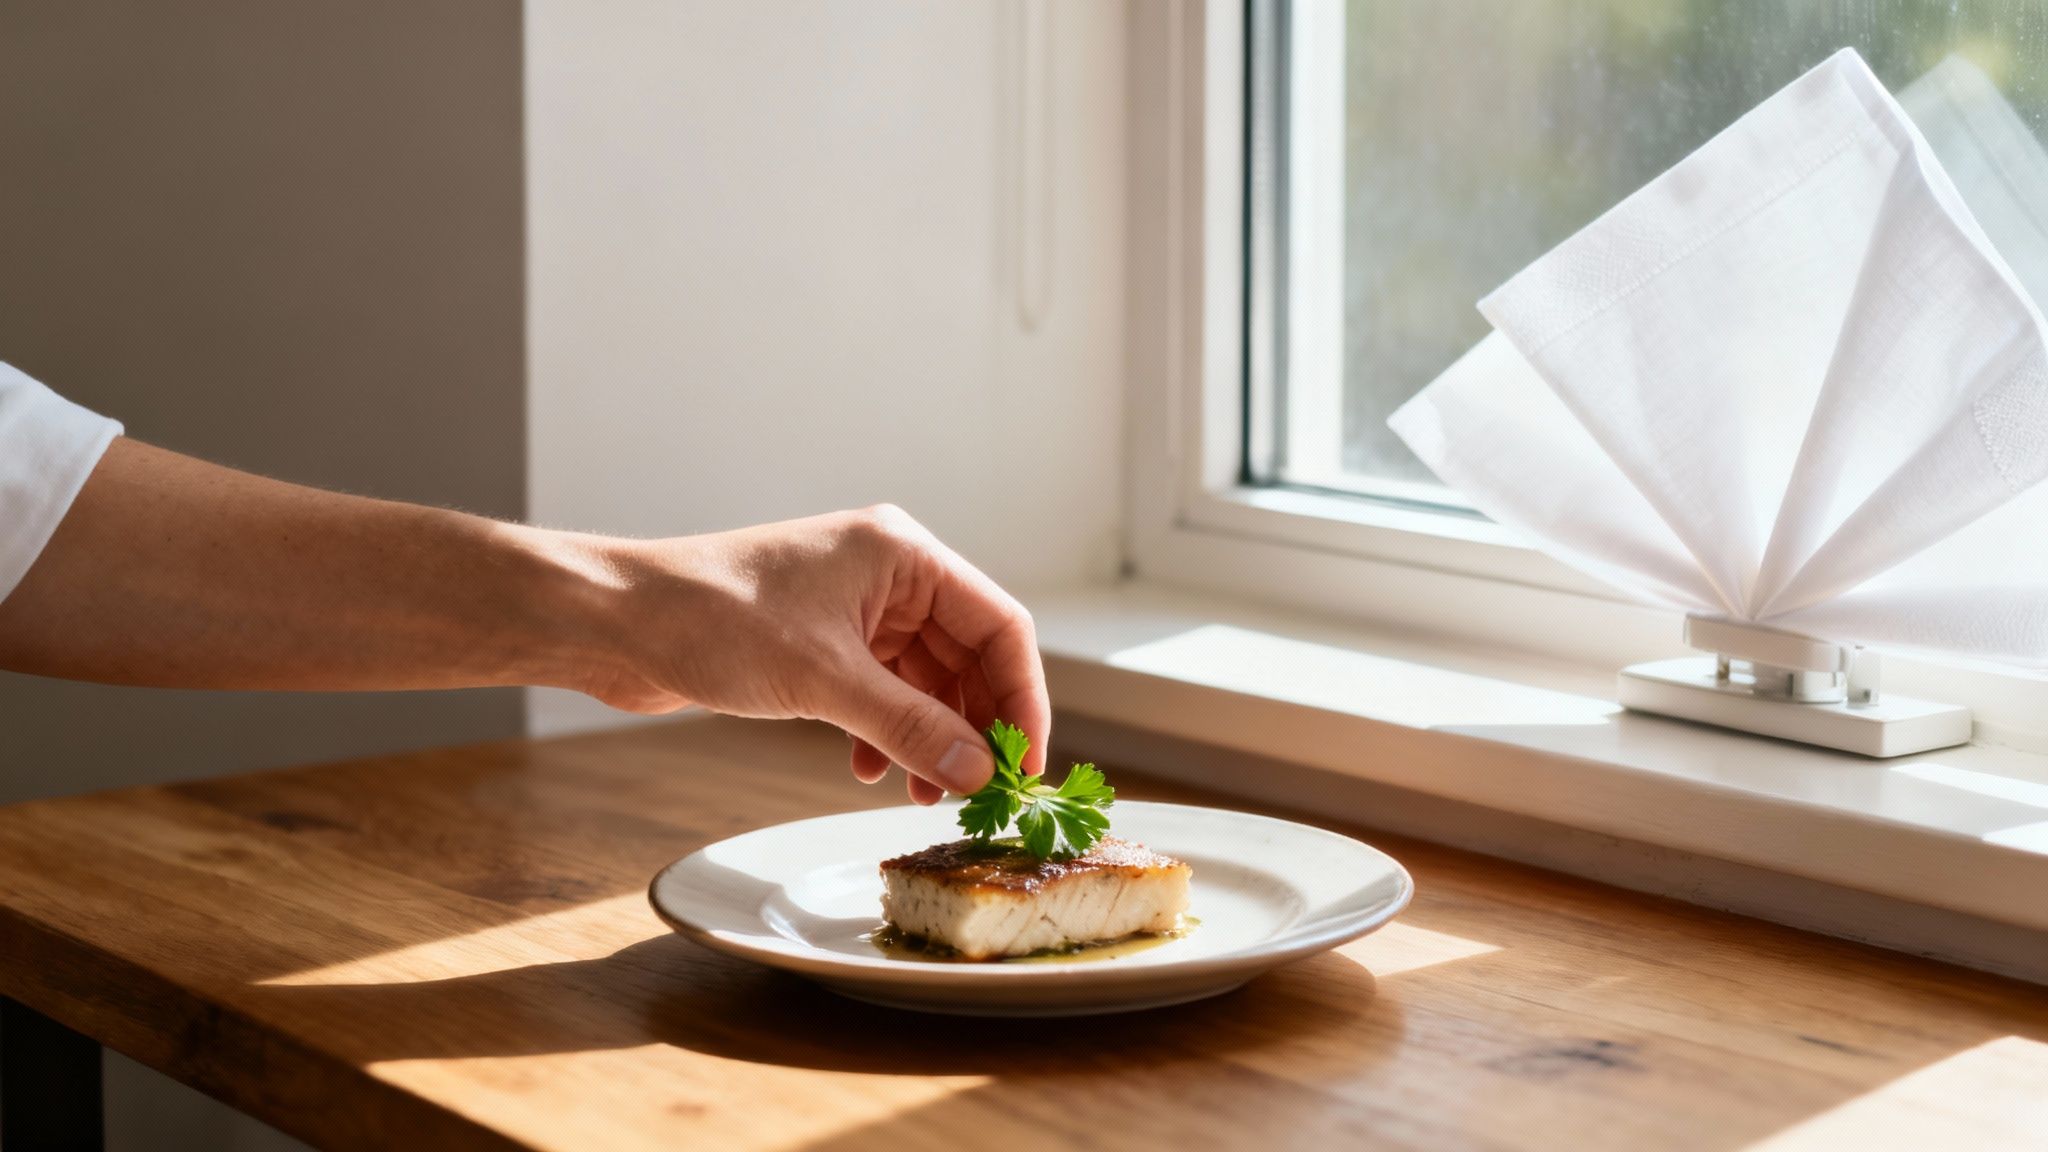
- Garnish at the last second. Add chopped herbs, a drizzle of olive oil or balsamic glaze, or a bit of citrus zest right before you shoot so everything looks crisp and fresh.
- Wipe the rim. Use a paper towel to clean up drips and smudges. A clean rim reads as professional; a messy one reads as careless.
Choose plates that complement your food, not compete with it. A neutral-colored plate in white, grey, or slate is almost always a safe bet because it lets the colors of the dish take center stage.
One more thing: diners want authenticity. Overly staged, plastic-looking photos are out. A few crumbs on the table or a casually placed napkin feels genuine, and that trend toward real-life settings and minimally styled dishes keeps growing, as covered in both Regan Communications' look at food photography trends and this overview of what's current in the food photography world.
Find the Best Angle and Composition
The angle you shoot from can make or break a photo. Different foods have different hero features, and your angle should show them off.
- Overhead (flat lay, 90 degrees): Your go-to for anything where the beauty is on top. Pizza, charcuterie boards, colorful salads, bowls of soup. It creates a clean, graphic look that works well on social media.
- 45-degree angle: The workhorse. This is how a customer sees the plate when it lands on their table, so it feels natural and inviting. It shows both the top and the side, giving the dish depth. Great for pasta, stews, and most entrees.
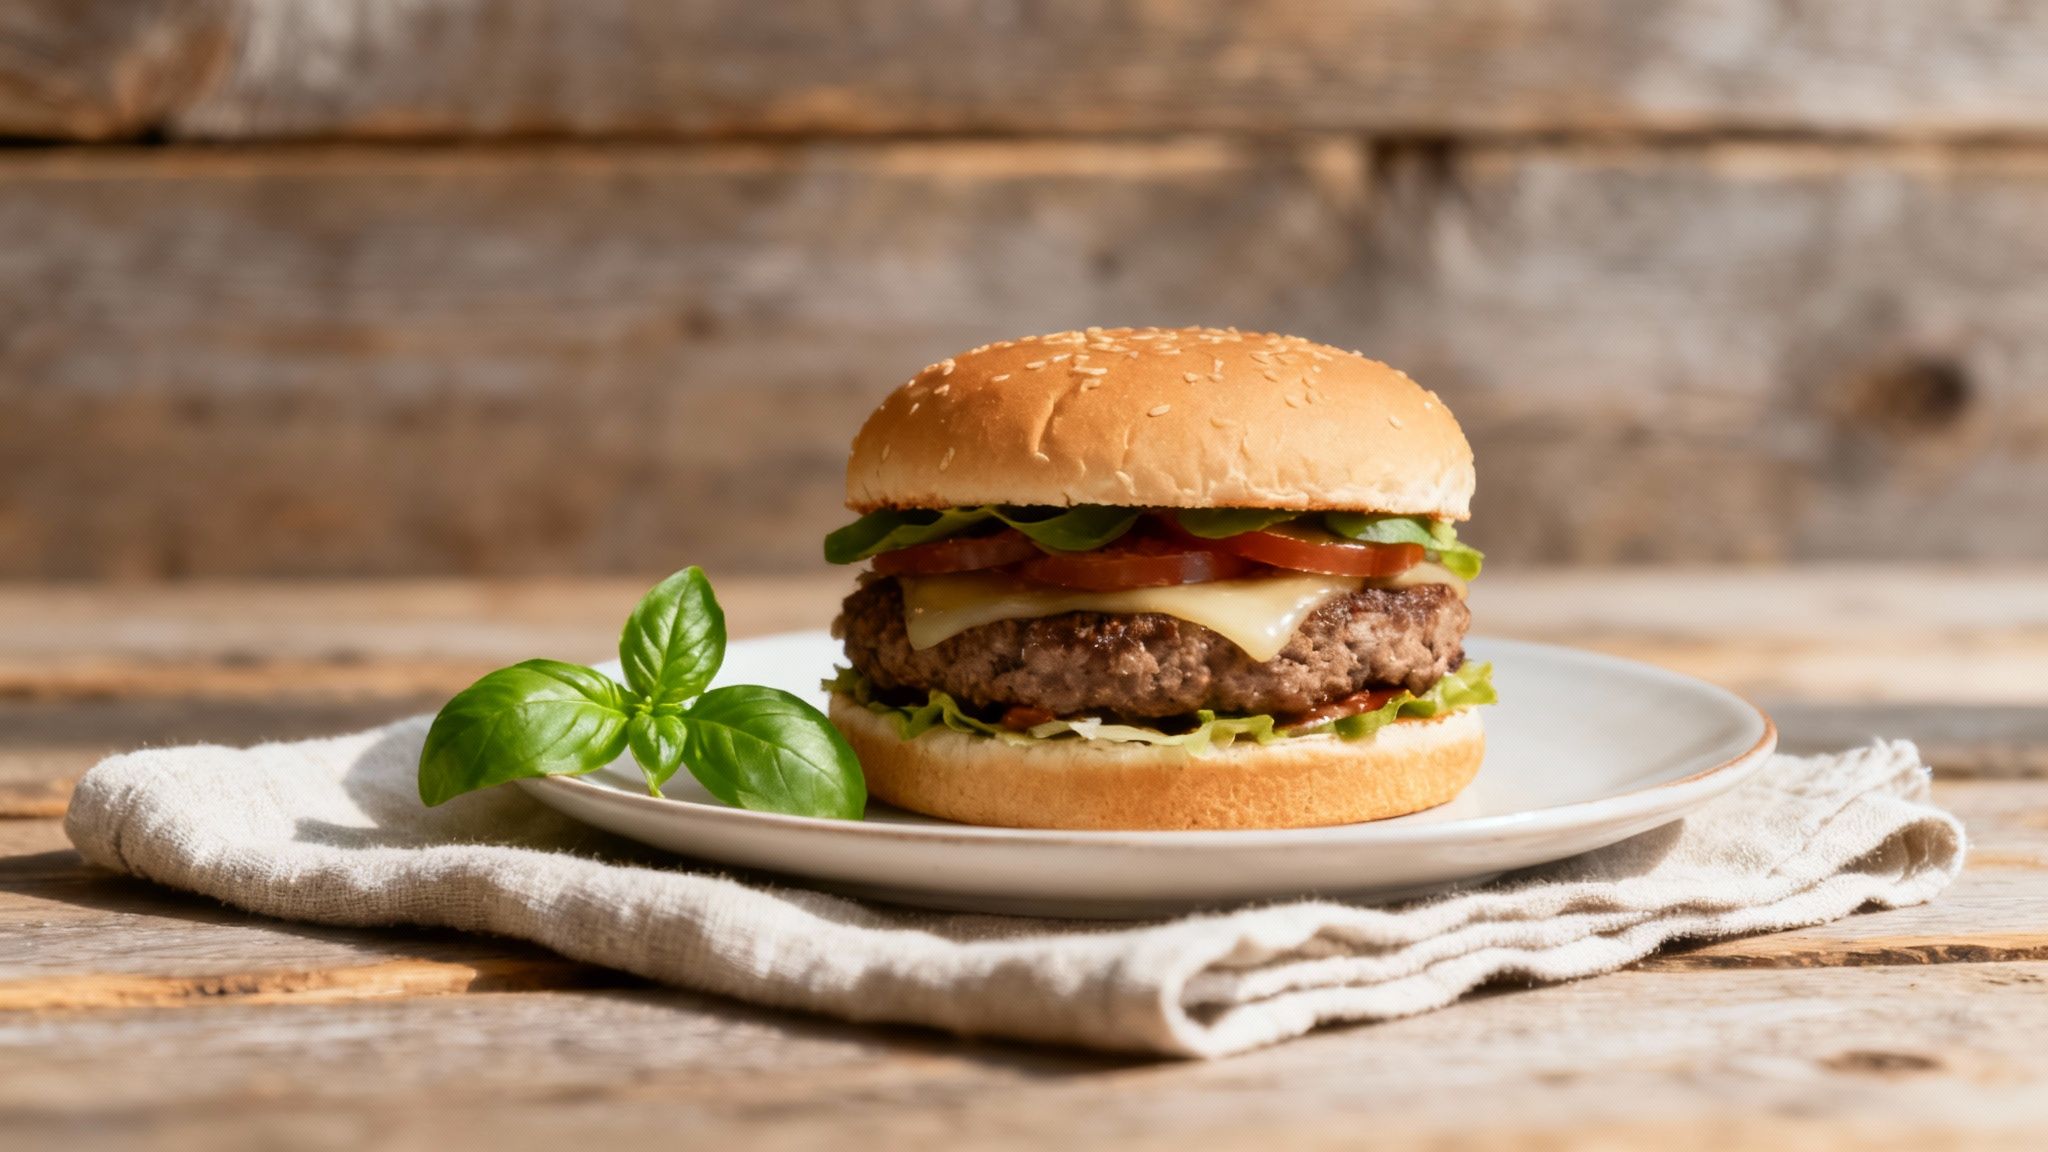
- Straight-on (eye level, 0-15 degrees): The only way to show off height. A stacked burger, a pile of pancakes, a layered cake or cocktail all look more substantial shot from the side.
Before you start shooting, ask yourself: what's the most interesting part of this dish? A side shot of a pizza is just crust. An overhead shot shows off every topping. A burger is the opposite: from above it's a bun, from the side it's a tower of layers.
Here's a simple rule: if it's tall, shoot it from the side. If it's flat, shoot it from above. And never settle for one angle. Take a few shots from each; you'll often be surprised which one captures the dish's personality.
Now use those gridlines you turned on. Instead of putting the dish dead center, place it along one of the lines or at an intersection. This is the Rule of Thirds, and the small shift instantly makes a photo more dynamic. Don't fear empty space either: leaving some negative space around the plate helps the dish stand out and gives the viewer's eye a place to rest.
For a deeper dive into styling and composition, our restaurant food photography guide and these food photography tips cover a lot more ground. If lighting is your weak spot, we also have a full guide to food photography lighting, and if you want to push further, see how to take professional food photos.
Give Your Photos a Professional Finish with AI
Even with perfect lighting and composition, a photo straight from your phone can look a little flat. Editing is where a good photo becomes a great one. But most editing software is complicated, expensive, and has a steep learning curve. You shouldn't have to become a graphic designer to get a good picture of your signature burger.
Think about the usual issues:
- Traditional photographers cost $75 to $150 per photo.
- DIY software is a massive time sink with a steep learning curve.
- Different editing styles across shoots weaken your brand's look.
- Waiting 2-7 days for edited photos slows down every menu update and social post.
This is the problem we built MenuCapture to solve. Instead of fiddling with sliders, you type what you want changed, and the AI applies it in about 10-30 seconds. It works with the photos you take on your smartphone, whenever you need them.
Imagine you've just perfected a new seasonal dessert and need a photo for Instagram now. Instead of calling a photographer, you snap a picture with your phone, upload it, and type "make the sauce more glossy" or "add steam." Thirty seconds later you have a polished shot that's ready to post.
Edit with Simple Text Commands
Text prompt editing is the core of MenuCapture. You literally tell the AI what you want:
- "Add melted cheese on top"
- "Make the sauce more glossy"
- "Add steam rising from the soup"
- "Change the lighting to warmer"
- "Swap the salmon for tuna"
Here's how that plays out with real dishes:
- Perfect a burger: Type "add melted cheese on top" and the AI adds realistic, gooey cheese that matches your photo's existing lighting.
- Fix a pasta shot: "Make sauce more glossy" gives your marinara that fresh, just-plated sheen.
- Show substitutions: Need an image of the dish with a different protein? "Swap lamb for duck" gets you a new menu image without cooking another plate.
The AI analyzes your photo's lighting, color, and composition so the changes look natural. Because it starts from a real photo of your real dish, the result is a polished image that still looks exactly like what customers will be served. You're not tricking anyone with a fake burger; you're showing them your burger in its most flattering light.
You can see the full workflow in our guide on how restaurant owners edit menu photos with AI text commands, and there's a broader overview in our article on AI food photography for restaurants.
The practical details:
- Accepts JPEG and PNG files
- Best results at a resolution of 1024x1024 pixels (other square or rectangular sizes work too)
- Processes up to 10 photos at a time
- Each edit takes 10-30 seconds
Edit Again Without Losing Anything
Your menu is always changing, so your photos should be living documents, not one-and-done files. MenuCapture keeps a full version history with thumbnails for every image. You can edit the same photo multiple times, undo with Ctrl+Z, redo with Ctrl+Y, and jump back to any earlier version. Added a vintage wood background last week but now want granite? Swap it in seconds without starting over.
All your images live in an organized gallery with automatic grouping by date and a search bar. Need that pasta shot from last spring? A quick search pulls it right up. And when you repurpose those images for social channels, a good social media post dimensions guide helps you crop them correctly for each platform.
Advanced Options for a Changing Menu
- Ingredient swapping: Running a duck special instead of the usual lamb? Type "swap lamb for duck" and the AI replaces the protein while keeping the garnishes, sauce, and lighting consistent. No reshoot, no recook.
- Grid editing: Divide a photo into a 2x2, 3x3, or 4x4 grid to make targeted adjustments to one area.
- Batch processing: Apply the same edit to up to 10 photos at once. A "warm lighting" prompt across all your new brunch shots turns an hour of work into a 30-second action.
- Background changes: Swap a boring backdrop for vintage wood, granite, or industrial concrete to match the marketing channel.

Social platforms keep raising the bar on food visuals, and each one rewards slightly different framing and style. For channel-by-channel specifics, see this guide on platform-specific food photography standards from Firebelly Marketing.
AI Editing vs Traditional Photography
If you run a restaurant, every decision boils down to time and money. Getting photos of your food is no exception. Let's put the two approaches side by side.
Here's what the traditional route actually involves:
- Finding a photographer and coordinating schedules, often weeks in advance
- Setting aside a full day of your operation for the shoot itself
- Paying $75 to $150 per photo, often before extras like food styling or additional edits
- Waiting another 2 to 7 days for the final images
- Paying again for reshoots when the menu changes
The invoice reflects every minute of that process. And if you need to reshoot a popular dish a year later, matching the original photographer's lighting and style is difficult and expensive. Different photographers over time means different looks across your menu.
| Factor | Traditional Photography | MenuCapture AI Processing |
|---|---|---|
| Cost per photo | $75-150 | $0.24 (weekly plan) or $0.09 (annual plan) |
| Turnaround | 2-7 days | 10-30 seconds |
| Scheduling | Booked weeks in advance | None; on demand, 24/7 |
| Equipment | Studio setup and lighting | Your smartphone |
| Consistency | Varies by photographer | Uniform results across every photo |
| Revisions | Reshoots cost extra | Edit as many times as you like, included |
That works out to saving over 99.9% on menu photo costs while cutting turnaround from days to seconds, at $9/week or $159/year.
The real difference is control. With a traditional photographer, your timeline and budget sit in someone else's hands. AI photo processing puts that control back where it belongs: with you. You get menu-ready images exactly when you need them.
This isn't about replacing the art of photography. It's a practical option for busy owners. For a fuller breakdown, see our comparison of AI vs. traditional photography costs and our detailed look at menu photography costs: traditional photographer vs AI processing.
Build a Repeatable Five-Minute Workflow
All the tips in the world won't help if they don't fit a hectic restaurant schedule. The secret is a simple, repeatable system that turns photography from a production into a quick daily task.
Here's a real-world sequence a cafe owner we know uses before the morning rush:
- Prep and style: The moment a new dish is ready, she places it at her dedicated photo spot, a rustic wood table near the front window, and adds a sprig of fresh herbs.
- Find the light: She turns the plate to catch soft morning light from the side, then uses a folded white menu to bounce light back into the shadows.
- Shoot multiple angles: With just her phone, she grabs one overhead shot and one at 45 degrees.
- Upload and edit: She picks her favorite and uploads it to MenuCapture.
- Refine with text: She types something like "add a bit of steam" or "make the lighting warmer" for the final polish.
The whole thing takes under five minutes, and the AI handles the tricky edits in 10-30 seconds.
The goal isn't to become a professional photographer. It's to build a reliable system for your restaurant. A simple, repeatable process is worth far more than one perfect shot.
The repeatable setup also solves consistency. Same window, same two or three backgrounds, same editing style: that's how you build a visual identity customers recognize, whether they're looking at your printed menu, your website, or your Instagram.
By building a simple, efficient workflow, you take back control of your restaurant's visual identity. What used to be a chore becomes a five-minute task, and every photo you produce works as a marketing asset you can find, re-edit, and reuse for months.
Frequently Asked Questions
Jumping into food photography for your own restaurant can feel daunting. Here are straight answers to the questions we hear most from owners and managers.
Do I really need a fancy camera?
No. A modern smartphone camera is more than capable of producing menu-quality images. What makes a food photo work is lighting and composition, not the price of the gear. A well-lit phone shot beats a poorly lit photo from a thousand-dollar DSLR every single time.
Your smartphone photo is also the perfect starting point for editing. With the right tools you can polish it into an image that holds up on your menu, website, and social feeds.
What are the biggest mistakes to avoid?
We see the same few mistakes over and over, and they're all easy to fix:
- Using the flash. Your phone's built-in flash creates greasy-looking glare and harsh shadows that flatten even a beautiful dish. Harsh overhead kitchen lights are nearly as bad. The fix costs nothing: move to a window with soft, natural light.
- Cluttered backgrounds. The food is the hero. Don't let a messy scene steal the spotlight.
- One angle for everything. The top-down shot doesn't suit every dish. A 45-degree angle is often the most flattering for anything with height, because it shows the food the way a customer sees it at the table.
Will AI-edited photos look fake?
Fair question. Many AI tools generate images from scratch, and those can look artificial. MenuCapture works differently: it edits a genuine photo of your actual food. You use prompts like "brighten colors slightly" or "make sauce glossier" to polish the image, not to invent a fantasy dish. Because it starts from your real plate, the result still looks like what the customer will be served.
How do I keep my menu photos consistent?
Build a repeatable setup:
- Pick one spot. Find a table by a window with good natural light and use it every time, so your lighting stays constant.
- Stick to the same 2-3 backgrounds. A wooden board and a piece of slate are plenty. This creates a cohesive theme across the menu.
- Edit with a plan. Apply the same editing style to every photo. With MenuCapture you can run the same prompt across a batch of up to 10 photos, which keeps colors, brightness, and overall feel identical.
How much time does this take per dish?
Once you've found your photo spot, the process is fast:
- Setup and shooting: about 5-10 minutes to plate the dish, find the light, and take a few angles
- AI processing: 10-30 seconds per photo to upload and type your changes
You can go from finished plate to menu-ready image in well under 15 minutes, versus the weeks a traditional shoot can take.
What if I'm not a food stylist?
You don't have to be. The goal is fresh and appealing, not a magazine cover. Use a clean plate, wipe the rim, add a simple garnish right before shooting, and keep the background uncluttered. Let the food be the star.
What photo files can I use?
MenuCapture accepts standard JPEG and PNG files. A resolution of 1024x1024 pixels hits the sweet spot between sharp detail and fast uploads, though other square and rectangular sizes work too.
In other words, whatever your phone produces by default will work fine. No conversion step needed.
Ready to see how quickly you can improve your menu photos? With MenuCapture, your smartphone shots become professional-quality images in seconds.
Ready to transform your menu photos?
Type what you want changed and AI processes your restaurant photos in seconds.
Start Processing Photos