
Food Photography & Lighting for Restaurants: A Practical Guide
Great food photography starts with one simple truth: lighting shapes your dish. It's not about the camera you own, but how you control the light hitting the plate. The right light adds texture, creates depth, and makes a sauce glisten or a pastry look flaky. It turns a simple snapshot into an image that makes people book a table.
Why Lighting Matters More Than Your Camera
You pour real work into every dish, but the photos you snap under harsh kitchen fluorescents rarely do them justice. Customers eat with their eyes first: research shows food photos influence nearly two out of three people in their dining decisions. A flat, poorly lit picture can be the difference between a new reservation and a customer scrolling right past your menu.
For years, the only fix was hiring a professional photographer. That means $75-150 per photo, weeks to schedule a shoot, and another 2-7 days waiting for final images. For a busy restaurant owner, that process is often too slow and expensive to be practical, especially for daily specials.
Here's the good news: the quality of your photos has far more to do with light than gear. A well-lit shot from your phone will beat a poorly lit shot from a $3,000 DSLR every time. Grubhub reports that professional, well-lit food photography can boost a restaurant's sales, and you can read more about how lighting trends shape customer perception.
There's also been a shift in what customers want. About 60% of brands now intentionally feature food with small "imperfect" details like a few crumbs or an artful spill, because those touches drive up to 30% more engagement than perfectly polished studio shots. You can find more insights on this photography trend online. Authentic beats sterile. That works in your favor: you don't need a studio, you need to get the fundamentals right.
What Good Light Actually Does for a Photo
The direction and quality of your light source do three concrete things for your menu photos:
- It creates texture: Light from the side or slightly behind a dish casts tiny shadows that reveal detail. This is what makes a burger look juicy, a salad look crisp, and a pizza crust look crackly instead of flat.
- It keeps colors true to life: Good light makes the red of your tomato sauce and the green of your fresh basil look the way they do in your kitchen, not dull, washed out, or tinted yellow.
- It sets the mood: Soft, diffused light reads as warm and cozy, a natural fit for comfort food. Harder, more direct light creates drama and a more artistic feel. The way you light a dish changes how it feels, much like lighting sets the atmosphere in a room; the same principles used in architectural lighting design apply on a plate.
Key Takeaway: Mastering light is the single most important skill for making your food look as good as it tastes. Everything else, including gear and editing, comes second.
For a broader look at technique, our complete guide to food photography is a good companion to this article.
Common Lighting Mistakes and Quick Fixes
Most bad menu photos come down to a handful of repeat offenders. Here's what they look like and how to fix each one.
| Common Problem | What It Looks Like | How to Fix It |
|---|---|---|
| Using direct flash | Harsh shadows, greasy-looking hot spots, washed-out colors. | Turn off the flash and find a natural light source, like a window. |
| Shooting under overhead lights | Unnatural yellow or orange tint, deep distracting shadows, flattened texture. | Move the plate near a window. At night, use a soft lamp off to the side. |
| Mixing light sources | Conflicting color temperatures (blueish window light plus yellowish indoor light) that create a muddy look. | Turn off the indoor lights and rely solely on the window light. |
| Backlighting without a bounce | The front of the food is dark while the background is bright. | Place white foam board or a menu opposite the light source to bounce light back onto the food. |
The single biggest offender is top-down light: the dining room overheads or your phone's built-in flash. Both flatten the dish, kill texture, and cast color tints that make food look greasy. Just moving a plate a few feet to a better light source can instantly take a photo from amateur to professional.
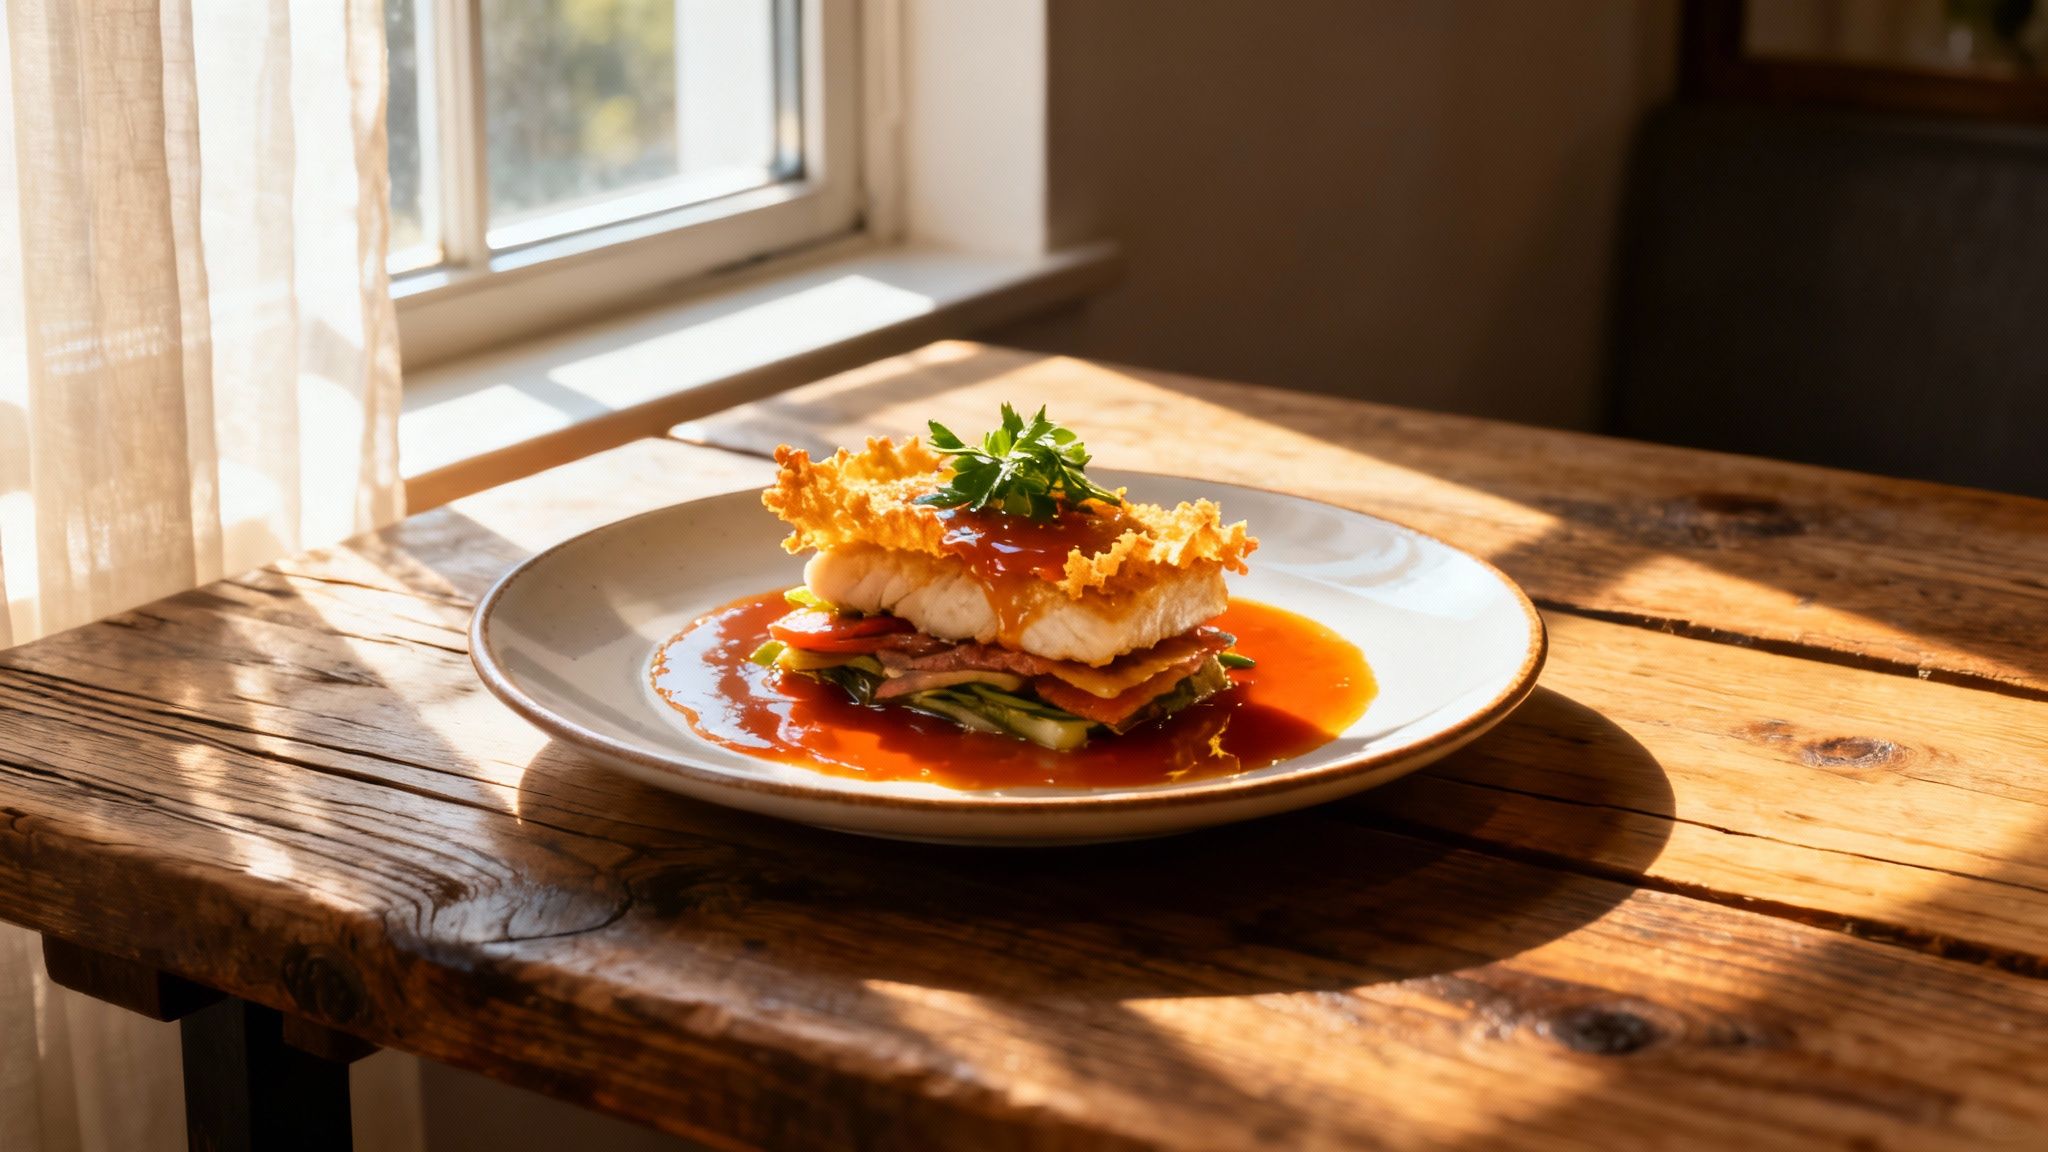
Using Natural Light: The Best Tool You Already Have
Your most powerful and affordable lighting tool isn't in a camera bag. It's a window. Natural light is soft, forgiving, and makes food look authentic. Around 85% of food photographers now prefer natural or daylight-style diffused lighting, according to 2025 photography trend data from Nikon.
The biggest mistake is placing your dish in direct, harsh sunlight, which creates stark shadows and washes out detail. What you want is soft, diffused light: think overcast day, or a window the sun isn't hitting directly.

Find Your Spot and Your Time
Walk through your restaurant at different times of day and just watch the light. Mid-morning and late afternoon usually offer the softest, most flattering light; intense midday sun is often too harsh. A quick test: hold your hand where you plan to put the dish. If the shadows on it are soft and gentle, you've found your spot. Sharp, dark shadows mean the light is too strong.
If you have a choice of windows, a north-facing window is the photographer's favorite: it never gets direct sun, so it delivers gentle, consistent light all day long. And it's worth matching the time of day to the dish. Early morning light is cool and clean, a natural fit for breakfast plates and fresh produce. The "golden hour" just before sunset wraps everything in a warm glow that flatters desserts, drinks, and cozy comfort food.
Use Side Lighting
Once you've found the light, don't shoot with the window behind you. Position the dish so the light hits it from the side. Side lighting sculpts the food with soft shadows that define its shape: it highlights the crumb of a muffin, the layers of a sandwich, the gloss on a sauce. Without those shadows, food looks flat.
Try this: place a dish on a table about three feet from a window, with the window to the left or right of your camera. Watch how the light rakes across the surface and brings out texture.
Three Cheap Tools That Shape the Light
A few dollars of craft-store foam board gives you real control:
- White foam board (the reflector): Place it on the side of the dish opposite the window. It bounces soft light back into the shadows and evens out the plate. In a pinch, a folded white menu or a clean napkin works too. Angle it until you see it catch the light and brighten the dark side.
- Black foam board (the absorber): Want a moodier, more dramatic look? Black board does the opposite: it deepens shadows and adds contrast, which can make certain dishes stand out.
- A thin white sheet (the diffuser): If the sun is too strong, hang a white sheet or sheer curtain over the window. It scatters the light into a gentle, even glow.
Natural Lighting Quick Setup Guide
| Element | Best Practice | Why It Works |
|---|---|---|
| Location | Table near a large window, out of direct sun. | Bright, soft, even light without harsh shadows. |
| Time of Day | Mid-morning or late afternoon. | Lower sun means softer, more flattering light. |
| Fill Light | White foam board opposite the window. | Bounces light back to fill dark shadows. |
| Drama | Black foam board opposite the window. | Absorbs light for deeper shadows and contrast. |
| Harsh Light | Thin white sheet over the window. | Diffuses direct sunlight into a gentle glow. |
Key Takeaway: A window with indirect light, your phone, and a piece of white foam board are enough to produce beautifully lit menu photos. Master this simple setup before you buy anything.
Smartphone Technique: Composition and Styling
Lighting is the big one, but two other things separate a decent phone photo from a great one: how you frame the shot and how you set the scene.
Frame the Shot
The rule of thirds is your friend. Imagine a tic-tac-toe grid over your screen (most phone cameras can display one). Instead of centering the dish, place it along a line or where two lines intersect. It's a small move that makes a photo feel intentional.
Then pick your angle. For food, two angles almost always win:
- Overhead (flat lay): Shooting straight down works for pizzas, colorful salads, and grain bowls. It shows off every topping.
- 45-degree angle: This is how a customer sees the dish at the table. It's the right call for anything with height: a burger, a layered sandwich, a slice of cake.
Style the Scene
Styling is about telling a small story without cluttering the frame. Check the plate first: no smudges, no fingerprints. Then add a little life with one or two simple props, like a linen napkin, a nice fork, or a couple of fresh ingredients from the dish. Keep it simple. The food is always the hero.
If you want to go deeper on these techniques, our restaurant food photography guide covers composition and camera settings in more detail, and our guide on how to take professional food photos walks through settings for the gear you already have.
Creating Consistent Light When the Sun Isn't an Option
Let's be practical: dinner service happens at night, and natural light is unreliable. Rainy afternoons, dark corners, a new special that needs a photo right now. You need a plan that doesn't involve the fluorescents.
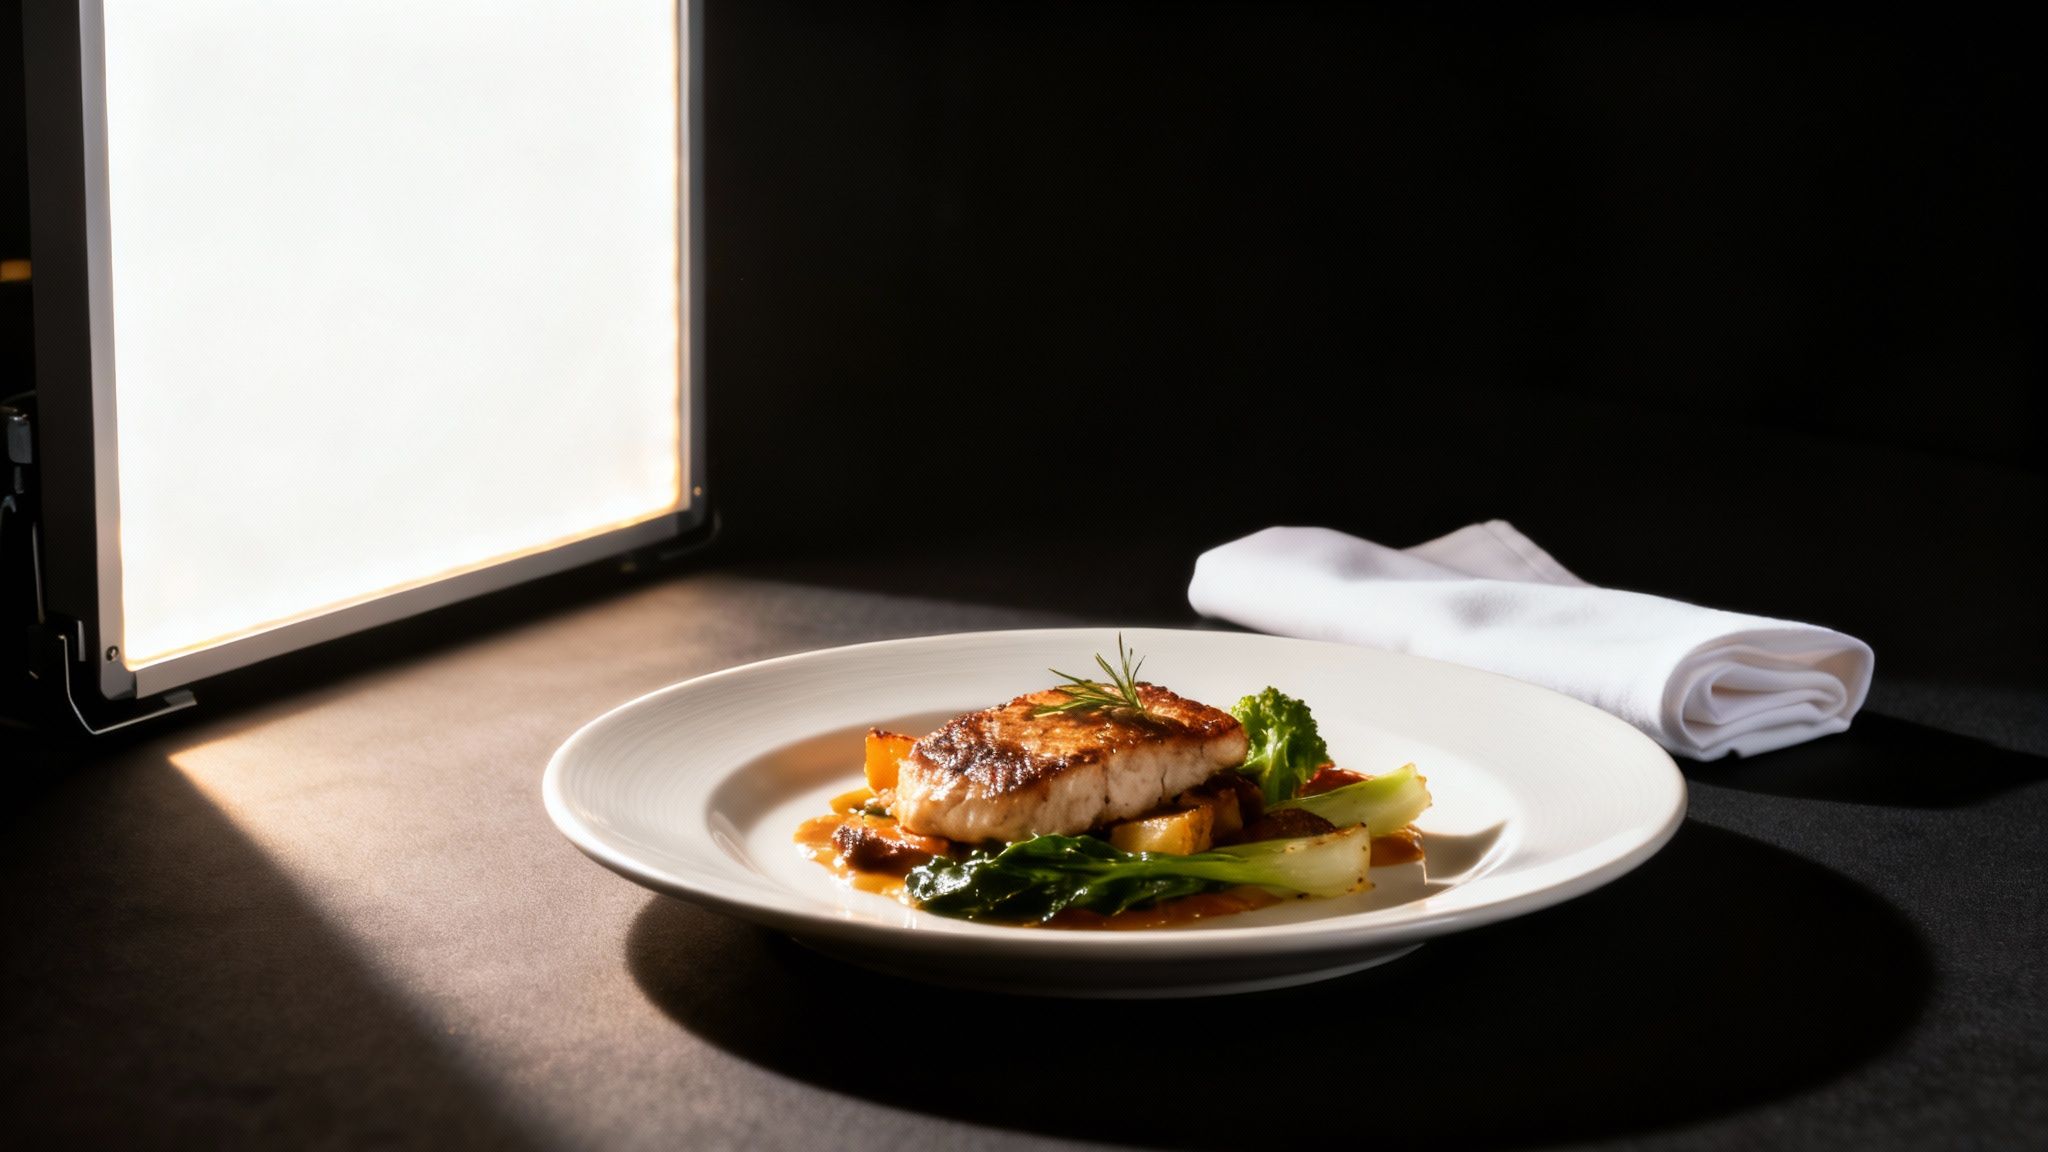
The goal of artificial light is simple: mimic the soft, directional quality of window light on demand. You don't need studio gear. Three straightforward options:
- Small LED panel: Portable and adjustable. Look for one that lets you control both brightness and color temperature, ideally with a built-in diffuser. This becomes your portable "window." For a busy restaurant, it's usually the most practical pick: compact, cool-running, and quick to set up.
- Softbox: A light with a large fabric box over it that diffuses everything into a very soft, gentle glow. The light quality is excellent, but softboxes are bulkier and take a few extra minutes to assemble.
- Household lamp: In a pinch, a desk lamp works if you swap in a daylight-balanced bulb (marked 5000K-5600K). That one change stops photos from looking overly yellow.
Still torn between waiting for good sun and buying a light? Here's how the two compare:
| Attribute | Natural Light | Artificial Light |
|---|---|---|
| Cost | Free | Small upfront investment |
| Consistency | Varies with weather, time, and season | Identical results anytime |
| Color quality | Authentic, but temperature shifts through the day | Clean and neutral with a good bulb |
| Learning curve | Easier to start | Slightly steeper to avoid harsh looks |
| Best for | Daytime shoots, a fresh organic feel | Evening service, batch shoots, consistency |
The One-Light Setup
Here's a repeatable setup you can assemble in minutes:
- Position your key light: Place the lamp or LED panel a few feet from the dish, at roughly a 45-degree angle to the side. Same principle as the window: side light creates texture and depth.
- Diffuse it: A bare light can be harsh. Put a thin white sheet or a piece of parchment paper from the kitchen between the light and the food to soften the shadows.
- Fill the shadows: Place white foam board (or a folded napkin) on the dark side of the dish to bounce light back in.
Whether your light source is a window or an LED, the steps to shape it are identical: one directional source, diffuse it, bounce the fill.
Get the Color Right
Color temperature matters more than most people realize. Warm yellowish light suits a hearty stew; a clean daylight look suits a fresh salad. Most LED panels let you dial this in. Here's a useful breakdown on warm white versus cool white light. Once you find a setting that makes your food look right, write it down and use it for every shoot. Consistency across your whole menu is what makes it look professional.
With a dedicated corner and this one-light setup, you can capture consistent photos in minutes, whether you're shooting a brunch special on a sunny morning or a new dessert at 10 PM.
For more on the gear side, see our guide to continuous photography lighting.
What Great Photos Really Cost: Traditional vs. AI
So you've got the lighting down. The last piece is editing, and this is where the traditional route gets expensive. Hiring a photographer means paying for their time, gear, and post-production. Standards for visual content keep rising, as industry analysis from firms like Firebelly Marketing shows, and a photoshoot is never a one-day affair: planning, setup, the shoot itself, then days of waiting.
Here's what the two paths actually look like side by side:
| Factor | Traditional Photography | MenuCapture AI Processing |
|---|---|---|
| Cost per photo | $75 - $150 | $0.09 (annual plan) - $0.24 (weekly plan) |
| Turnaround time | 2 - 7 days | 10 - 30 seconds |
| Scheduling | Weeks in advance | None needed |
| Equipment | Studio setup | Works with smartphone photos |
| Consistency | Varies by photographer | Consistent AI results |
| Re-shoots | Cost extra | Edit as many times as you want, included |
For a 20-item menu, the traditional route can easily run $2,000 and a week of waiting. And you repeat that bill every time the menu changes. The traditional method isn't just more expensive: it's a logistical bottleneck that makes it impractical to photograph daily specials at all.
With AI editing, you save over 99% on menu photo costs and get results in seconds instead of days. You can shoot a new dish in the morning and have the photo on your social media before the lunch rush.
For a deeper breakdown of the numbers, see our guides on AI vs. traditional photography and menu photography costs.
Editing Your Photos in Seconds with Simple Text
Getting the lighting right is the foundation, but the final edit is where a good photo becomes a menu-ready one. You don't have time to learn complicated software, and you shouldn't have to.
That's why we built MenuCapture. Most AI photo tools generate random fake food images. MenuCapture edits your actual photos: the dishes your kitchen actually plates, polished the way a professional editor would polish them.
Just Type What You Want
You edit by describing the change in plain English. Upload a photo and type things like:
- "Add steam coming off the soup."
- "Make the sauce on the pasta more glossy."
- "Change lighting to warmer."
- "Get rid of the dark shadow on the left side of the plate."
The AI analyzes your image and your words and delivers the edit in about 10-30 seconds. Because it understands food photography, the lighting adjustments look natural, not fake. If your smartphone shot is almost there but a stubborn shadow or a yellow tint is holding it back, this replaces the reshoot entirely. See exactly how it works in our guide on editing menu photos with AI text commands.
A Workflow Built for Experimenting
Great edits rarely happen on the first try, so the workflow supports layering. Make the sauce glossier, look at it, then type "now brighten the image." You can edit the same photo as many times as you want, and every version is saved with a thumbnail. Keyboard shortcuts like Ctrl+Z (undo) and Ctrl+Y (redo) mean you can never really mess up: just jump back to an earlier version. All your images land in a gallery, grouped by date and searchable.
Beyond Basic Fixes
The same text commands handle bigger changes:
- Ingredient swaps: "Swap the chicken for tofu" or "change the lamb to duck" lets you showcase menu variations without a second photoshoot.
- Background changes: "Put this dish on a rustic wood table" or "place on a granite surface" fixes a cluttered kitchen counter instantly. Our food background generator shows what's possible.
- Batch processing: Rolling out a new menu? Apply edits to up to 10 photos at once instead of working one by one.
Your Top Food Photography and Lighting Questions, Answered
These are the questions we hear most often from restaurant owners. Straight answers below.
What's the biggest lighting mistake restaurants make?
Using the dining room's overhead lights or the phone's built-in flash. Both create harsh top-down light with ugly shadows and color casts that make even a beautiful dish look flat and greasy. The fix: turn them off and use one soft, directional light source from the side of the dish. A window is ideal; a diffused LED panel works just as well.
Can I really get professional-level photos with my smartphone?
Yes. Modern phone cameras are more than good enough for menu photos. The quality of the final image depends far more on lighting and composition than on gear. A well-lit, well-composed smartphone photo beats a poorly lit shot from an expensive camera every time. Smartphones now capture over 60% of all food-related images shared daily, per these photography statistics.
My restaurant is dark. How do I get good photos at night?
Don't rely on the dining room lights. Get an affordable LED panel with a diffuser, place it to the side of the dish at a 45-degree angle, and put a white bounce card on the opposite side. That setup mimics window light and gives you the same consistent result at noon or midnight.
My photos have harsh, dark shadows. What's the fix?
Bounce light back into them. Take anything white (foam board, a menu with a white back, a folded napkin) and hold it on the shadow side of the dish, opposite your light source. Tilt it until it catches the light and reflects it onto the food. You'll watch the shadows soften in real time. The goal is to shape shadows, not eliminate them: soft shadows are what give food dimension.
Why do my food photos have a strange yellow or blue tint?
That's mixed lighting. When cool bluish window light and warm yellowish indoor bulbs hit the plate at the same time, your camera tries to average the two color temperatures and the colors come out skewed. The fix is to pick one source and stick with it: if you're shooting by the window, turn off every overhead light and lamp in the room. Getting this right is a big deal even at the pro level. North America alone accounted for 32.75% of global photography lighting market revenue, per Fortune Business Insights, which tells you how seriously professionals take controlling their light.
Will AI-edited photos look fake?
Not if the tool edits your real photos. Most AI image generators invent pictures from thin air, which is useless for a restaurant: customers need to see your actual dishes. MenuCapture starts with the photo of the burger your chef actually made and adjusts light, shadow, and color based on what you type. The result is a polished version of your real food, not a fantasy dish. And if an edit goes too far, you can dial it back or revert to any earlier version.
Do I need any special skills to use AI editing?
No. If you can type a text message, you have all the skill you need. Instead of learning sliders and layers, you type "make the colors of the vegetables more vibrant" or "change the background to a dark wood surface" and the edit is done for you. Everything is saved and organized automatically, so there's no file management to learn either.
What if my starting photo is bad?
A good starting shot always helps, but the AI is built to fix common problems. Too dark? Yellow tint from the kitchen lights? Type "brighten the image and make lighting neutral" and it's handled in seconds. It can also sharpen details, adjust colors, and swap a cluttered background. Think of the lighting techniques in this guide as your best starting point and the AI as your safety net.
What's the real price difference vs. hiring a photographer?
A professional food photographer runs $75-150 per photo with a 2-7 day turnaround. A 20-item menu can mean a $2,000 invoice and a week of waiting. MenuCapture plans cost $9/week or $159/year, which works out to $0.24 or $0.09 per photo, with results in about 30 seconds. That's a savings of over 99%, and re-edits are included.
Ready to see what your menu could look like? MenuCapture turns your smartphone shots into professional menu photos in seconds. Upload restaurant photos
Ready to transform your menu photos?
Type what you want changed and AI processes your restaurant photos in seconds.
Start Processing Photos